Start ur computer in safe mode with command prompt and type the followinf command to enable registry editor:-reg delete HKCU\software\microsoft\windows\currentversion\policies\system /v “DisableRegistryTools”
and run HKLM\software\microsoft\windows\currentversion\policies\system /v “DisableRegistryTools”
after this ur registry editor is enable
type explorer
go to run and type regedit
then follow the following path :-
HKLM\Software\Microsoft\Windows\Currentversion\Run
on the right side delete the entries which contain ‘Brontok’ and ‘Tok-’ words.
after that restart ur system
open registry editor and follow the path to enable folder option in tools menu
HKCU\Software\Microsoft\Windows\Currentversion\Policies\Explorer\ ‘NoFolderOption’
delete this entry and restart ur computer
and search *.exe files in all drives (search in hidden files also)
remove all files which are display likes as folder icon.
ur computer is completely free from virus brontok
Saturday, September 25, 2010
Make your Windows Xp Copy 100% Genuine!
Making your copy of windows genuine..works perfect making your copy of windows genuine many of you might have tried windows update and found out that your copy of windows is not genuine…here’s how to make your copy of windows genuine…download jellybean keyfinder from here:
http://www.magicaljellybean.com/beta/
Now open keyfinder.exe Click on options and click “change windows key”Now enter this key and you’re done.
*******************************************************
V2C47-MK7JD-3R89F-D2KXW-VPK3J
*******************************************************
http://www.magicaljellybean.com/beta/
Now open keyfinder.exe Click on options and click “change windows key”Now enter this key and you’re done.
*******************************************************
V2C47-MK7JD-3R89F-D2KXW-VPK3J
*******************************************************
Thursday, September 2, 2010
XP Installation – The 34 minute hiccup
You want to install XP professional and suddenly you realize that it freezes up at the mention of 34 minutes remaining! You try all your efforts to make it running but nothing seems to be working to your dismay. You try checking your RAM, checking for any bad sectors in your hard drive, even your motherboard (as I have done) but cannot make a conclusion as to what’s the answer to your woes.
So what is the solution to the defamed 34 minute XP installation hangup problem?
Its as simple as deleting a simple file which caused the installation to freeze.
So what is the solution to the defamed 34 minute XP installation hangup problem?
Its as simple as deleting a simple file which caused the installation to freeze.
- Let the XP hang up at 34 minutes remaining for the first time
- remove the CD from the CDROM and reboot
- Dont enter the CD when the installation asks for it, instead open the DOS prompt (Shift + F10)
- goto C:/Windows and type setupapi.log, hit enter
- The setupapi.log file opens in a notepad
- Scroll to the very last few lines in the file and search for the word “inf”
- You will notice that in the last few moments the installation created a file with the extension “.inf” before dying out (in my case it was the faulty modem for which XP created the file mdmcxpt.inf).
- It means that the device mentioned in the last few lines is faulty and you have to make the installation skip through it.
- Close the notepad and go to the folder C:/windows/inf in command prompt
- Browse through the files to find the “.inf” which was related to the faulty device.
- Straightaway delete the inf file (eg: del mdmcxpt.inf)
- now put in the XP installation CD and Continue the installation
Monday, August 23, 2010
Windows Tips And Tricks
This is an amazing trick to amaze your friends.By using this trick you can make your computer to speak whatever you type.This trick is working on all microsoft operating system and does not require any programming skills.You have to follow just simple steps and your own Text to Voice software will be ready.If you show this software to any of your friends he will be certainly impressed with you .
Ok,the trick is fairly simple and requires only 3 simple steps from your side.Let’s Begin the tutorial with screenshots to Make Your Computer Speak Whatever You Type
1.Open Notepad and copy and paste the following code into it
2.Now save the notepad file with the name speak.vbs at your desktop.
3.Now double click on speak.vbs type in the box whatever you want your computer to speak for you.
Ok,the trick is fairly simple and requires only 3 simple steps from your side.Let’s Begin the tutorial with screenshots to Make Your Computer Speak Whatever You Type
1.Open Notepad and copy and paste the following code into it
Dim message, sapi
 message=InputBox("What do you want me to say?","Speak to Me")
 Set sapi=CreateObject("sapi.spvoice")
 sapi.Speak message
2.Now save the notepad file with the name speak.vbs at your desktop.
3.Now double click on speak.vbs type in the box whatever you want your computer to speak for you.
Wednesday, August 18, 2010
Install JDownloader Via PPA Repository Ubuntu Lucid
JDownloader is a a java-based tool that completely automates the downloading process. It can be very helpful for websites such as Rapidshare.com or Megaupload.com for both premium and free users.
Among JDownloader features are: captcha recognition, multi-part downloads, tweak wait times, auto-reconnect, scheduler and even automatic file extraction. JDownloader has way too many features and plugins to list them here, so make sure you check it out if you haven't already!
I recently came across an Ubuntu Launchpad PPA repository for JDownloader and wanted to share it with everybody.
Once installed, you can find JDownloader under the Applications > Internet menu.
Installing JDownloader via the PPA isn't too much different than downloading it from it's website since a script automatically downloads and installs the latest JDownloader version in both cases (not 100% sure about this though), I found this as a great opportunity to remind you of JDownloader, which many consider to be the best download manager.
Among JDownloader features are: captcha recognition, multi-part downloads, tweak wait times, auto-reconnect, scheduler and even automatic file extraction. JDownloader has way too many features and plugins to list them here, so make sure you check it out if you haven't already!
I recently came across an Ubuntu Launchpad PPA repository for JDownloader and wanted to share it with everybody.
To add the JDownloader PPA, simply paste this in a terminal:
sudo add-apt-repository ppa:jd-team/jdownloader
Then, to install JDownloader:sudo apt-get update && sudo apt-get install jdownloader Once installed, you can find JDownloader under the Applications > Internet menu.
Installing JDownloader via the PPA isn't too much different than downloading it from it's website since a script automatically downloads and installs the latest JDownloader version in both cases (not 100% sure about this though), I found this as a great opportunity to remind you of JDownloader, which many consider to be the best download manager.
Saturday, August 14, 2010
How to connect to Streamyx with DLink 2640-T wireless router
I found in my website log, apparently somebody trying to find out how to connect to Streamyx broadband using the latest DLink 2640T. Since I own one, I decided to share my settings to enable you to connect to Streamyx.

Your Dlink wireless router should be able to connect to Streamyx broadband services now.
- First point your favorite browser to http://192.168.1.1/, enter your username and password (default: admin | admin)
- Web configuration user interface will be displayed, click WAN
- Change the VPI value from '8' to '0'
- Enter your Streamyx username and password below
- Finally go to Tools->System. Click "Save and Reboot" there to save your changes.
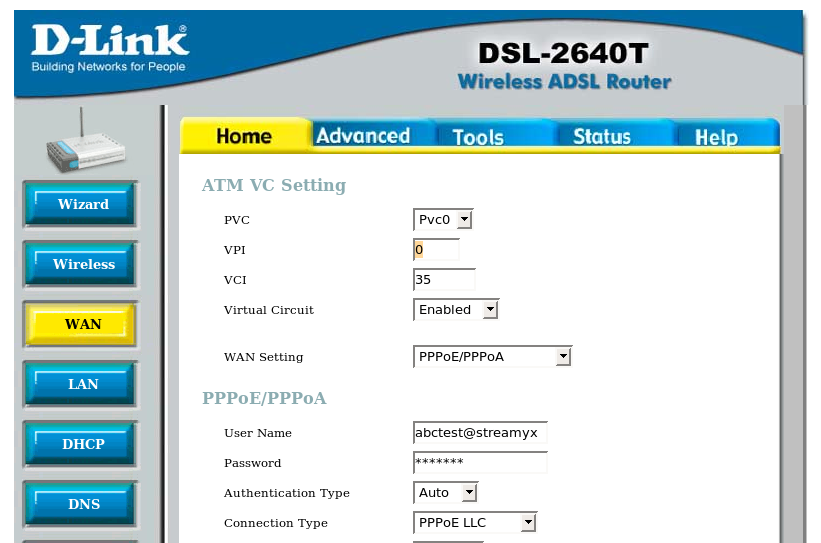
Your Dlink wireless router should be able to connect to Streamyx broadband services now.
Wednesday, July 14, 2010
Set A Static IP Address On Ubuntu 10.04 Lucid Lynx
It is not intuitively obvious how to assign Ubuntu 10.04 Lucid Lynx a a static IP address from the command line. However, much of Linux administration involves the editing of text files, and assigning a static IP address is no different. You’ll need to edit the following file:
/etc/network/interfaces
Initially, the file only contains information about your local loopback address:
auto lo
iface lo inet loopback
To assign a static IP address, you’ll need to make some changes to this file.
Let’s say you want to assign a static IP of 192.168.1.2 to your eth0 network connection (the first Ethernet adapter on your system; if you only have one, it will be eth0), with a subnet mask of 255.255.255.0 and a local gateway of 192.168.1.1. First, make a backup copy of the interfaces file:
sudo vi /etc/network/interfaces
(Obviously you can substitue emacs or your editor of choice.)
Once the file is open, add the following lines:
Once you’ve added these lines, save the interfaces file to disk, and exit your text editor. If you want to add a static DNS server, you’ll need to edit the /etc/resolv.conf file with this command:
sudo vi /etc/resolv.conf
To set a static DNS server with the address of 192.168.1.10, add this line to the file:
You’ll then to need have your system load the new IP configuration. You can do that by rebooting, but if that takes too long, you can use this command to force Ubuntu to re-read the configuration files:
Your system will then have a static IP address.
/etc/network/interfaces
Initially, the file only contains information about your local loopback address:
auto lo
iface lo inet loopback
To assign a static IP address, you’ll need to make some changes to this file.
Let’s say you want to assign a static IP of 192.168.1.2 to your eth0 network connection (the first Ethernet adapter on your system; if you only have one, it will be eth0), with a subnet mask of 255.255.255.0 and a local gateway of 192.168.1.1. First, make a backup copy of the interfaces file:
sudo cp /etc/network/interfaces ~
This will make a backup copy in your home directory in case something goes amiss during the editing process. Next, fire up a text editor:sudo vi /etc/network/interfaces
(Obviously you can substitue emacs or your editor of choice.)
Once the file is open, add the following lines:
iface eth0 inet static
address 192.168.1.2
netmask 255.255.252.0
gateway 192.168.1.1
address 192.168.1.2
netmask 255.255.252.0
gateway 192.168.1.1
Once you’ve added these lines, save the interfaces file to disk, and exit your text editor. If you want to add a static DNS server, you’ll need to edit the /etc/resolv.conf file with this command:
sudo vi /etc/resolv.conf
To set a static DNS server with the address of 192.168.1.10, add this line to the file:
nameserver 192.168.1.10
Save the file, and exit your text editor.You’ll then to need have your system load the new IP configuration. You can do that by rebooting, but if that takes too long, you can use this command to force Ubuntu to re-read the configuration files:
sudo ifup eth0
Your system will then have a static IP address.
Saturday, July 3, 2010
Ubuntu Networking Configuration Using Command Line
The basics for any network based on *nix hosts is the Transport Control Protocol/ Internet Protocol (TCP/IP) combination of three protocols. This combination consists of the Internet Protocol (IP),Transport Control Protocol (TCP), and Universal Datagram Protocol (UDP).
By Default most of the users configure their network card during the installation of Ubuntu. You can however, use the ifconfig command at the shell prompt or Ubuntu’s graphical network configuration tools, such as network-admin, to edit your system’s network device information or to add or remove network devices on your system
Configure Network Interface Using Command-Line
You can configure a network interface from the command line using the networking utilities. You configure your network client hosts with the command line by using commands to change your current settings or by editing a number of system files.
Configuring DHCP address for your network card
If you want to configure DHCP address you need to edit the /etc/network/interfaces and you need to enter the following lines replace eth0 with your network interface card
sudo vi /etc/network/interfaces
# The primary network interface – use DHCP to find our address
auto eth0
iface eth0 inet dhcp
Configuring Static IP address for your network card
If you want to configure Static IP address you need to edit the /etc/network/interfaces and you need to enter the following lines replace eth0 with your network interface card
sudo vi /etc/network/interfaces
sudo /etc/init.d/networking restart
If you are server system administrator or normal user some time you need to assign a second ipaddress to your Ubuntu machine.For this you need to edit the /etc/network/interfaces file and you need to add the following syntax.Below one is the only example you need to chnage according to your ip address settings
sudo vi /etc/network/interfaces
auto eth0:1
iface eth0:1 inet static
address 192.168.1.60
netmask 255.255.255.0
network x.x.x.x
broadcast x.x.x.x
gateway x.x.x.x
You need to enter all the details like address,netmask,network,broadcast and gateways values after entering all the values save this file and you need to restart networking services in debian using the following command to take effect of our new ipaddress.
After entering all the details you need to restart networking services using the following command
sudo /etc/init.d/networking restart
Setting your ubuntu system hostname
Setting up your hostname upon a ubuntu installation is very straightforward. You can directly query, or set, the hostname with the hostname command.
As an user you can see your current hostname with
sudo/bin/hostname
Example
To set the hostname directly you can become root and run
sudo /bin/hostname newname
When your system boots it will automatically read the hostname from the file /etc/hostname
If you want to know more about how to setup host name check here
Setting up DNS
When it comes to DNS setup Ubuntu doesn’t differ from other distributions. You can add hostname and IP address to the file /etc/hosts for static lookups.
To cause your machine to consult with a particular server for name lookups you simply add their addresses to /etc/resolv.conf.
For example a machine which should perform lookups from the DNS server at IP address 192.168.3.2 would have a resolv.conf file looking like this
enter the following details
search test.com
nameserver 192.168.3.2
By Default most of the users configure their network card during the installation of Ubuntu. You can however, use the ifconfig command at the shell prompt or Ubuntu’s graphical network configuration tools, such as network-admin, to edit your system’s network device information or to add or remove network devices on your system
Configure Network Interface Using Command-Line
You can configure a network interface from the command line using the networking utilities. You configure your network client hosts with the command line by using commands to change your current settings or by editing a number of system files.
Configuring DHCP address for your network card
If you want to configure DHCP address you need to edit the /etc/network/interfaces and you need to enter the following lines replace eth0 with your network interface card
sudo vi /etc/network/interfaces
# The primary network interface – use DHCP to find our address
auto eth0
iface eth0 inet dhcp
Configuring Static IP address for your network card
If you want to configure Static IP address you need to edit the /etc/network/interfaces and you need to enter the following lines replace eth0 with your network interface card
sudo vi /etc/network/interfaces
# The primary network interfaceAfter entering all the details you need to restart networking services using the following command
auto eth0
iface eth0 inet static
address 192.168.3.90
gateway 192.168.3.1
netmask 255.255.255.0
network 192.168.3.0
broadcast 192.168.3.255
sudo /etc/init.d/networking restart
If you are server system administrator or normal user some time you need to assign a second ipaddress to your Ubuntu machine.For this you need to edit the /etc/network/interfaces file and you need to add the following syntax.Below one is the only example you need to chnage according to your ip address settings
sudo vi /etc/network/interfaces
auto eth0:1
iface eth0:1 inet static
address 192.168.1.60
netmask 255.255.255.0
network x.x.x.x
broadcast x.x.x.x
gateway x.x.x.x
You need to enter all the details like address,netmask,network,broadcast and gateways values after entering all the values save this file and you need to restart networking services in debian using the following command to take effect of our new ipaddress.
After entering all the details you need to restart networking services using the following command
sudo /etc/init.d/networking restart
Setting your ubuntu system hostname
Setting up your hostname upon a ubuntu installation is very straightforward. You can directly query, or set, the hostname with the hostname command.
As an user you can see your current hostname with
sudo/bin/hostname
Example
To set the hostname directly you can become root and run
sudo /bin/hostname newname
When your system boots it will automatically read the hostname from the file /etc/hostname
If you want to know more about how to setup host name check here
Setting up DNS
When it comes to DNS setup Ubuntu doesn’t differ from other distributions. You can add hostname and IP address to the file /etc/hosts for static lookups.
To cause your machine to consult with a particular server for name lookups you simply add their addresses to /etc/resolv.conf.
For example a machine which should perform lookups from the DNS server at IP address 192.168.3.2 would have a resolv.conf file looking like this
sudo vi /etc/resolv.conf
enter the following details
search test.com
nameserver 192.168.3.2
Monday, June 7, 2010
How to start System Restore by using the Command prompt Win XP
Note You must be logged on to Windows with a user account that is a computer administrator to complete these steps. To verify that you are logged on to Windows with a user account that is a computer administrator.
Important If you have not previously set a restore point in System Restore, you cannot restore your computer to a previous state. If you are not sure, or if you have not previously set a restore point.
To start System Restore using the Command prompt, follow these steps:
Important If you have not previously set a restore point in System Restore, you cannot restore your computer to a previous state. If you are not sure, or if you have not previously set a restore point.
To start System Restore using the Command prompt, follow these steps:
- Restart your computer, and then press and hold F8 during the initial startup to start your computer in safe mode with a Command prompt.
- Use the arrow keys to select the Safe mode with a Command prompt option.
- If you are prompted to select an operating system, use the arrow keys to select the appropriate operating system for your computer, and then press ENTER.
- Log on as an administrator or with an account that has administrator credentials.
- At the command prompt, type %systemroot%\system32\restore\rstrui.exe, and then press ENTER.
- Follow the instructions that appear on the screen to restore your computer to a functional state.
Monday, May 31, 2010
youtube-dl: Download videos from YouTube.com
What is it?
youtube-dl is a small command-line program to download videos from YouTube.com. It requires the Python interpreter, version 2.x (x being at least 4), and it's not platform specific. It should work in your Unix box, in Windows or in Mac OS X. The latest version is 2010.04.04. It's released to the public domain, which means you can modify it, redistribute it or use it however you like.I'll try to keep it updated if YouTube.com changes the way you access their videos. After all, it's a simple and short program. However, I can't guarantee anything. If you detect it stops working, check for new versions and/or inform me about the problem, indicating the program version you are using. If the program stops working and I can't solve the problem but you have a solution, I'd like to know it. If that happens and you feel you can maintain the program yourself, tell me.ok.
Usage instructions
In Windows, once you have installed the Python interpreter, save the program with the .py extension and put it somewhere in the PATH. Try to follow the guide to install youtube-dl under Windows XP.In Unix, download it, give it execution permission and copy it to one of the PATH directories (typically, /usr/local/bin).
After that, you should be able to call it from the command line as youtube-dl or youtube-dl.py. I will use youtube-dl in the following examples. Usage instructions are easy. Use youtube-dl followed by a video URL or identifier. Example: youtube-dl "
http://www.youtube.com/watch?v=foobar". The video will be saved to the file foobar.flv in that example. As YouTube.com videos are in Flash Video format, their extension should be flv. In Linux and other unices, video players using a recent version of ffmpeg can play them. That includes MPlayer, VLC, etc. Those two work under Windows and other platforms, but you could also get a specific FLV player of your taste.If you try to run the program and you receive an error message containing the keyword SyntaxError near the end, it means your Python interpreter is too old.
More usage tips
- You can change the file name of the video using the -o option, like in youtube-dl -o vid.flv "
http://www.youtube.com/watch?v=foobar". Read the Output template section for more details on this. - Some videos require an account to be downloaded, mostly because they're flagged as mature content. You can pass the program a username and password for a YouTube.com account with the -u and -p options, like youtube-dl -u myusername -p mypassword "
http://www.youtube.com/watch?v=foobar". - The account data can also be read from the user .netrc file by indicating the -n or --netrc option. The machine name is youtube in that case.
- The simulate mode (activated with -s or --simulate) can be used to just get the real video URL and use it with a download manager if you prefer that option.
- The quiet mode (activated with -q or --quiet) can be used to supress all output messages. This allows, in systems featuring /dev/stdout and other similar special files, outputting the video data to standard output in order to pipe it to another program without interferences.
- The program can be told to simply print the final video URL to standard output using the -g or --get-url option.
- In a similar line, the -e or --get-title option tells the program to print the video title.
- The default filename is video_id.flv. But you can also use the video title in the filename with the -t or --title option, or preserve the literal title in the filename with the -l or --literal option.
- You can make the program append &fmt=something to the URL by using the -f or --format option. This makes it possible to download high quality versions of the videos when available.
- The -b or --best-quality option can be used to download the highest available quality version of any given video.
- The -m or --mobile-version option is an alias for -f 17.
- The -d or --high-def option is an alias for -f 22.
- Normally, the program will stop on the first error, but you can tell it to attempt to download every video with the -i or --ignore-errors option.
- The -a or --batch-file option lets you specify a file to read URLs from. The file must contain one URL per line.
- The program can be told not to overwrite existing files using the -w or --no-overwrites option.
- It can be told to attempt to continue interrupted downloads with the -c or --continue option.
- For YouTube, you can also use the URL of a playlist, and it will download all the videos in that playlist.
- For YouTube, you can also use the special word ytsearch to download search results. With ytsearch it will download the first search result. With ytsearchN, where N is a number, it will download the first N results. With ytsearchall it will download every result for that search. In most systems you'll need to use quotes for multiple words. Example: youtube-dl "ytsearch3:cute kittens".
- youtube-dl honors the http_proxy environment variable if you want to use a proxy. Set it to something like
http://proxy.example.com:8080, and do not leave thehttp://prefix out. - You can get the program version by calling it as youtube-dl -v or youtube-dl --version.
- For usage instructions, use youtube-dl -h or youtube-dl --help.
- You can cancel the program at any time pressing Ctrl+C. It may print some error lines saying something about KeyboardInterrupt. That's ok.
Output template
The -o option allows users to indicate a template for the output file names. The basic usage is not to set any template arguments when downloading a single file, like in youtube-dl -o funny_video.flv "http://some/video". However, it may contain special sequences that will be replaced when downloading each video. The special sequences have the format %(NAME)s. To clarify, that's a percent symbol followed by a name in parenthesis, followed by a lowercase S. Allowed names are:- id: The sequence will be replaced by the video identifier.
- url: The sequence will be replaced by the video URL.
- uploader: The sequence will be replaced by the nickname of the person who uploaded the video.
- title: The sequence will be replaced by the literal video title.
- stitle: The sequence will be replaced by a simplified video title, restricted to alphanumeric characters and dashes.
- ext: The sequence will be replaced by the appropriate extension (like flv or mp4).
- epoch: The sequence will be replaced by the Unix epoch when creating the file.
- ord: The sequence will be replaced by a five-digit number that will be increased with each download, starting at zero.
Tuesday, May 11, 2010
How to Format a Hard Drive in Linux Command Line
Preparation
3)Linux refers to hard drive
4)The examples given in this how-to are for a computer with two IDE hard drives attached as a master and slave. In this, the drives are "hda" and "hdb." You will need to determine the letter of the drive you want to format for your own setup. We will be formatting the drive hdb. For all examples, replace "hdb" with whatever your drive designation is.
5)You can see all the drives attached to your system by typing the command "ls /dev/hd*" or "ls /dev/sd*", depending on which type (IDE, SATA and so forth) the drives are. On the example system, the result of this command looks like "/dev/hda /dev/hda1 /dev/hda2 /dev/hdb /dev/hdb1". The operating system is installed on hda, which has two partitions (hda1 and hda2), and there is one partition on hdb and hdb1.
2)At the command prompt, type "fdisk /dev/hdb", replacing the "hdb" with the letters for your drive. Upon opening, fdisk may give you a couple of warnings, all of which can be ignored. It then gives you a prompt that looks like this: Command (m for help):
3)Enter "p" to see the partition table of the drive. The first line of output from the "p" command will also tell you the size of the drive. This is a good way to double-check that you are working with the correct drive.
4)If there are any partitions already on the drive, they will be listed as the last lines of the "p" command. On our example, this looks like "/dev/hdb1", followed by some information about the partition's size and filesystem.
5)To delete any existing partitions, press "d" and then "Enter." It will ask you which partition number you wish to delete. The number of the partition is the number that follows hdb, so on our example system, we enter 1. If there are multiple partitions, repeat the "d" command for each one. You can always view the partition table again with the "p" command.
6)Once you have deleted all existing partitions on the drive, you are ready to make a new one. Type "n" and hit "Enter." Then press "p" to create a primary partition. It asks you for a partition number; enter "1." Now you are asked which cylinder the partition should start at. The beginning of the drive is the default, so just hit "Enter." Then, you are asked for the last cylinder. The end of the drive is the default, so you can just press "Enter" again.
7)Now you are back at fdisk's command prompt. Use the "p" command to check the partition table. You should now see your new partition at the bottom of the output. In the example, it lists as "/dev/hdb1."
8)You now need to set the filesystem type for your new partition with the "t" command. You are asked for the Hex code of the filesystem you wish to use. We will use the standard Linux ext2 filesystem, which is "83." If you are doing something special and know of a particular filesystem that you need to use, you can press "L" to see all the codes, which are one or two characters made up of the numbers 0 to 9 and the letters a to f.
9)Now just issue the "w" command to write your new partition table and exit fdisk.
2)At the command prompt, enter "mkfs -t ext2 /dev/hdb1", while remembering to change the hdb1 to whatever the letters are for the partition you just created.
3)If you are using a different filesystem than ext2, you will have to specify that where "ext2" is in the above command.
2)At the command prompt, type "fsck -f -y /dev/hdb1", again replacing hdb1 with the letters and number for your partition.
3)After fsck runs, your new drive is formatted. Restart your system before using it.
4)If you reformatted your system drive, you will now need to boot off an installation disk to install an operating system.
1)When you format a computer hard drive, you will lose everything that is on the drive. Therefore, it is very important to back up anything you might later want.
2)To format a secondary drive, you will need root access. All commands used in this tutorial are run from a command line (terminal) as root. You may also want to make note of the size (total capacity in MB) of the drive.3)Linux refers to hard drive
4)The examples given in this how-to are for a computer with two IDE hard drives attached as a master and slave. In this, the drives are "hda" and "hdb." You will need to determine the letter of the drive you want to format for your own setup. We will be formatting the drive hdb. For all examples, replace "hdb" with whatever your drive designation is.
Using fdisk
1)First, you will use the fdisk command to erase any old partitions on the drive and create a new one. Any changes you make using fdisk are only made permanent if you then issue the "w" command before quitting, so feel free to play around a little if you like. If at any time you find yourself stuck, you can quit the program without saving changes by holding the "Ctrl" key and pressing "c."2)At the command prompt, type "fdisk /dev/hdb", replacing the "hdb" with the letters for your drive. Upon opening, fdisk may give you a couple of warnings, all of which can be ignored. It then gives you a prompt that looks like this: Command (m for help):
3)Enter "p" to see the partition table of the drive. The first line of output from the "p" command will also tell you the size of the drive. This is a good way to double-check that you are working with the correct drive.
4)If there are any partitions already on the drive, they will be listed as the last lines of the "p" command. On our example, this looks like "/dev/hdb1", followed by some information about the partition's size and filesystem.
5)To delete any existing partitions, press "d" and then "Enter." It will ask you which partition number you wish to delete. The number of the partition is the number that follows hdb, so on our example system, we enter 1. If there are multiple partitions, repeat the "d" command for each one. You can always view the partition table again with the "p" command.
6)Once you have deleted all existing partitions on the drive, you are ready to make a new one. Type "n" and hit "Enter." Then press "p" to create a primary partition. It asks you for a partition number; enter "1." Now you are asked which cylinder the partition should start at. The beginning of the drive is the default, so just hit "Enter." Then, you are asked for the last cylinder. The end of the drive is the default, so you can just press "Enter" again.
7)Now you are back at fdisk's command prompt. Use the "p" command to check the partition table. You should now see your new partition at the bottom of the output. In the example, it lists as "/dev/hdb1."
8)You now need to set the filesystem type for your new partition with the "t" command. You are asked for the Hex code of the filesystem you wish to use. We will use the standard Linux ext2 filesystem, which is "83." If you are doing something special and know of a particular filesystem that you need to use, you can press "L" to see all the codes, which are one or two characters made up of the numbers 0 to 9 and the letters a to f.
9)Now just issue the "w" command to write your new partition table and exit fdisk.
Creating the New Filesystem With mkfs
1)Now you need to create the filesystem on the drive. This is done with the "mkfs" command.2)At the command prompt, enter "mkfs -t ext2 /dev/hdb1", while remembering to change the hdb1 to whatever the letters are for the partition you just created.
3)If you are using a different filesystem than ext2, you will have to specify that where "ext2" is in the above command.
Finalizing the Format With fsck
1)All that is left is to run a check on the drive and enter it into your fstab so that the drive mounts each time you start your computer. This can be done with a single fsck command.2)At the command prompt, type "fsck -f -y /dev/hdb1", again replacing hdb1 with the letters and number for your partition.
3)After fsck runs, your new drive is formatted. Restart your system before using it.
4)If you reformatted your system drive, you will now need to boot off an installation disk to install an operating system.
Monday, May 3, 2010
Setting Up A Samba Server with Windows XP Clients
First Setting up the Smb Server:
1) For setting up samba server configure smb.conf file which is usually found under /etc/samba/ directory.Notes: After changing smb.conf always restart the samba server
Commands to be used:
./smbd stop
./smbd start
2) Changes to be done in the smb.conf file are
Notes:
a) Whenever you modify this file you should run the command "testparm" to check that you have not made any basic syntactic errors.
b) Read the smb.conf man page to understand the various parts of the file
In the Global section [global] the significant entries are:
[global]
logon drive = p: // Here you can set the drive letter
encrypt passwords = yes /* To allow only specific hosts who can connect to server below entry is used make sure localhost is added */
hosts allow = IP-address, 127.0.0.1/255.255.255.0
logon home = \\netbiosname\%U // home directories will be mounted as the user logs on.
passwd program = /usr/bin/passwd %u
wins support = yes //Enable the windows support
dns proxy = no
netbios name = wealhtheow //Set the netbiosname
netbios aliases = rch01 //Set the alias, this is optional
unix password sync = No //Sync the unix passwords
(Samba (actually 'smbd') makes use of the file 'smb.conf' to know about its configuration. During installation of samba, smb.conf is created in the directory '/etc/samba' by default. But in FreeBSD all the system configuration files are put in the directory /usr/local/etc/. There were two smb.conf files that were existing on this system and therefore a link was created from /etc/samba/smb.conf to the actual file used by FreeBSD which is /usr/local/etc/smb.conf. This was done to make sure that the Samba server uses the correct version of the configuration file. To resolve the passwords problem, the smb.conf file was modified to remove synchronization between the Samba and Unix passwords.)
logon path = \\rch01\profiles\%U // This will tell the server where to place the home directories
workgroup = rch.uky.edu // Workgroup to be used, all clients should have the same workgroup
os level = 64 // set the OS level
// Below entries are important in order to tell that Samba server is the domain controller
domain logons = yes
pam password change = yes
preferred master = yes
domain master = yes
local master = yes In the [homes] section the following entries are important :
[homes]
comment = Home Directories
browseable = no
writable = yes
valid users = %S
read only = no
create mode = 0600
directory mode = 0700 logon home = \\rch01\%U // This tells where is the home directory for the user
hide files = /*.pst/
In the [profiles] section the path variable tells where the profiles are to be placed and make sure the directories are created with right names
[profiles]
create mode = 0600
directory mode = 0700
path = /home/samba/profiles/
profile acls = yes
read only = no
writable = yes
Configuring the Windows XP Client:
Notes : Only Windows XP-Professional Edition can join the Domain, it does not work for WindowsXP-Home Edition.
STEPS:
1) Make sure that the workstation belonged to the same workgroup as the server and have a fixed IP address and hostname assigned.
2) Change the registry entry, run the command regedt32 and do the below
a) RequireSignOrSeal Registry hack
HKEY_LOCAL_MACHINE\SYSTEM\CurrentControlSet\Services\netlogon\parameters
"RequireSignOrSeal"=dword:00000000 b) Use the Registry Editor and edit the
HKEY_LOCAL_MACHINE\SOFTWARE\Policies\Microsoft\Windows\System\CompatibleRUPSecurity to have the DWORD value of 1
3) Use the Group Policy Editor (gpedit.msc) and enable "Computer Configuration\Administrative Templates\System\User Profiles\Do not check for user ownership of Roaming Profile Folders".
4) Go to MyComputer right click Properties. Go to Change and click on Domain and enter the domain-name you want to join. When joining the domain for the First time enter userid as root and give the samba password. Make sure there is an entry for the root in the smbpasswd (samba password) file.
5) Reboot and then the changes will be effective.
Sunday, May 2, 2010

Wednesday, April 21, 2010
ImageMagick
Introduction
ImageMagick is free software delivered as a ready-to-run binary distribution or as source code that you can freely use, copy, modify, and distribute. Its license is compatible with the GPL. It runs on all major operating systems.
The functionality of ImageMagick is typically utilized:
- from the command line or
- from programs written in your favorite programming language. Choose from these interfaces: MagickCore (C), MagickWand (C), ChMagick (Ch), Magick++ (C++), JMagick (Java), L-Magick (Lisp), PascalMagick (Pascal), PerlMagick (Perl), MagickWand for PHP (PHP), PythonMagick (Python), RMagick (Ruby), or TclMagick (Tcl/TK). With a language interface, use ImageMagick to modify or create images automagically and dynamically.
We point the interested reader to http://www.imagemagick.org for the full documentation, download and installation of the software.
Conversion of file formats
The command line tool to convert from one graphics format to another is convert. The basic usage is straight forward:convert Ashwinie_Jassvendra.png Ashwinie_Jassvendra.jpgThe convert command guesses the required format from the filename extension (i.e. from png to jpg).

Ashwinie_Jassvendra.png
Identifying image types
The identify command allows quick identification of image files:
Jassvendra@slax:~# identify Ashwinie_Jassvendra.png
Ashwinie_Jassvendra.png PNG 632x474 632x474+0+0 8-bit
DirectClass 815KB 0.040u 0:00.039 Ashwinie_Jassvendra.png PNG 632x474 632x474+0+0 8-bit
Jassvendra@slax:~# identify Ashwinie_Jassvendra.jpg
Ashwinie_Jassvendra.jpg JPEG 632x474 632x474+0+0 8-bit
Ashwinie_Jassvendra.jpg JPEG 632x474 632x474+0+0 8-bit
DirectClass 65.6KB 0.000u 0:00.000
Changing the size
First, we'll make the image we have somewhat smaller. For example, suppose we would like to limit it to 250 pixel in the x-direction:
convert -geometry 250 Ashwinie_Jassvendra.png small_Ashwinie_Jassvendra.pngThe number of pixels in the other direction (i.e. y) will be chosen such that the proportions of the image are preserved:
Jassvendra@slax:~# identify small_Ashwinie_Jassvendra.png
small_Ashwinie_Jassvendra.png PNG 250x188 250x188+0+0 8-bit DirectClass 104KB 0.020u 0:00.019
Here is the smaller image:

Adding a frame
Actually, the size of the image would be better visible if we had a frame around the image. Here is the command to create a frame of 2 pixels in color black:
convert -geometry 250 -border 2 -bordercolor black small_Ashwinie_Jassvendra.png small_frame.png
Adding labels
There is a multitude of possible ways to add labels to a picture. One is to use the montage command line utility which can create a montage by putting together several pictures. This is often used to create index thumbnail pages for directories with many pictures. Here, we put together our normal image, and a piece of text ("Jassvendra The Hero"):
Jassvendra@slax:~# montage -geometry +0+0 -background skyblue -label "Jassvendra The Hero" small_Ashwinie_Jassvendra.png small_label.pngwhich results in this picture

ImageMagick has a number of quite sophisticated image processing options which includes the polaroid switch:
Jassvendra@slax:~# convert -caption "Jassvendra The Hero Polaroid" small.png -gravity center -background black +polaroid small_polaroid.png

Labeling on top of the Image itself
The problem with writing text directly on a picture is that you can't be sure the text will be readable in the color you have chosen. The image being drawn onto could be black, white or a rainbow of colors.
Outlined Label: The simplest method is to draw the string with a outline to separate the text from the image. However as the "-stroke" font setting adds thickness to a font both inward and outward, it is a good idea to draw the text twice.Jassvendra@slax:~# convert 06.jpg -gravity south -stroke '#000C' -strokewidth 2 -annotate 0 'nWo Computer LINUX' -stroke none -fill white -annotate 0 'nWo Computer LINUX' nwo.jpg

As you can see it works, but not very well. It does work better with a thicker font, than the default '
Times' or 'Arial' font. The more classical method to make the annotated text more visible is to 'dim" the image in the area the text will be added, then draw the text in the opposite color.Draw Dim Box: ImageMagick has the ability to draw transparent colors. This can be very useful to create a box to draw the text into.
Jassvendra@slax:~# convert 06.jpg -fill white -undercolor '#00000080' -gravity South -annotate +0+5 ' nWo Computer LINUX ' nwo03.jpg

Please visit http://www.imagemagick.org/Usage/annotating for a lengthy list of examples.
Saturday, April 17, 2010
ImageMagick Tutorial
How To ...
Format Conversion
Convert from gif to png.
convert p1.gif p2.png
Convert from png to jpg. Use “-quality” for compression/quality.
convert -scale 50% -quality 80% old.png new.jpg
Scaling and Cropping
Scale a image.
convert -scale 50% old.gif new.png
Autocrop border
convert -trim cat.png cat.png
Cropping (cutting) a image.
convert -crop 853x368+0+56 old.png new.png
The 853 and 368 would be the new image's width and height. The 0 is the offset on x-axis, and 56 is the offset of y-axis. The x and y axes's origin starts at the upper left corner.
To crop by specifying percentage of sides to cut, use “-shave”.
Color, Brightness, Saturation...
Increase brightness.
convert -modulate 150,100,100 old.png new.png
The above increase brightness by the multiplier 150%. To decrease, use values less than 100. The full argument to modulate are 3 numbers in the form “x,y,z”. The x is the brightness. The y is the saturation. The z is the hue. They are all interpreted as percentages.
Increase saturation.
convert -modulate 100,130,100 old.png new.png
The above increase color saturation by the multiplier 130%. To decrease, use values less than 100.
Color, bits per pixel, file size.
Change color image to gray scale.
convert -type Grayscale old.png new.png
Note: this does not necessarily force image format use indexed color to reduce size.
Reduce bits per pixel.
Use “-depth”. In particular, for a grayscale line art in png, you can do: convert -depth 8 old.png new.png. That makes it 8 bits. For clean black and white line art, you can use “-depth 2”. This is great for reducing file size. (see also “-colors”)
Reduce color.
convert -dither -colors 256 old.png new.png.
To reduce color without dithering, use “+dither” in place of “-dither”. Note that reducing colors does not necessarily reduce file size.
Image Filtering
Sharpen a image.
convert -sharpen 2 old.png new.png
Blur a image.
convert -blur 1 old.png new.png
Image Editing
Insert copyright notice.
convert -fill red -draw 'text 20 20 "© 2006 XahLee.org"' old.png new.png
Use -gravity SouthEast -font helvetica to put the text in other corners, and change font.
Flip and Rotate
How to rotate a image?
convert -rotate 90 x.png x.png. Positive degree means counter-clockwise.
How to flip a image?
To mirror it along a vertical line, use convert -flop x.png x.png. To mirror it alone a horizontal line, use “-flip”.
Batch Processing
Batch processing.
There are many ways to process all files in a directory in one shot. You can use the unix shell utils “find” and “xargs”, or write a bash shell script, or use Perl, Python, emacs.
Suppose you want to convert all files in a dir from png to jpg.
unix shell solution (programs assume GNU version):
find . -name "*png" | xargs -l -i basename -s ".png" "{}" | xargs -l -i convert -quality 85% "{}.png" "{}.jpg"
The “-l” makes it process one line at a time. The “-i” makes the “{}” to stand for file name. The “basename -s” strips the suffix.
To use emacs, basically you create a temp file temp.sh, and fill out this file with command lines like “convert p1.png p1.jpg”, “convert p2.png p2.jpg”, ..., then execute this file as shell script. The emacs commands to do this are:
“Ctrl+x Ctrl+f temp.sh” to create a file, “Ctrl+u Alt+! ls *png” to insert a list of png files. Type “Ctrl+Alt+%” then “\(.+\)\.png” and “convert \1.png \1.jpg” to replace each image file to the right command string. Then “Alt+! sh temp.sh” to execute the file as shell script. Also, the commands string-rectangle (Ctrl+x r t) and kill-rectangle (Ctrl+x r k) are helpful, because they let you cut/insert a column of text. For more emacs tips, see: Emacs and Unix Tips.
For Perl and Python solutions, see Making System Calls in Perl and Python.
Misc
Other options to explore:
* -annotate
* -comment
* -contrast-stretch
* -black-threshold
* -white-threshold
* -level
* -modulate
* -monochrome
* -normalize
* -quantize
* -blur
* -radial-blur
* -adaptive-blur
* -unsharp
* -adaptive-resize
* -adaptive-sharpen
* -despeckle
* -dither
* -enhance
* -equalize
* -gaussian
* -antialias
A complete tutorial with examples: http://www.imagemagick.org/Usage/.
ImageMagick resize Image
ImageMagick has some pretty cool commandline tools to manage images. Specifically I wanted to resize an image (make it smaller).
Code:
convert -resize 50% -quality 80 input.jpg output.jpg
You can change resize to a pixel size also: 800x600. Pretty handy and quick. Update: You can resize/recompress and entire directory of images using find and xargs. This works good if you need to resize an entire directory/camera full of images to save space.
Code:
find . -iname "*.jpg" | xargs -l -i convert -quality 75 {} /tmp/output/{}
Code:
convert -resize 50% -quality 80 input.jpg output.jpg
You can change resize to a pixel size also: 800x600. Pretty handy and quick. Update: You can resize/recompress and entire directory of images using find and xargs. This works good if you need to resize an entire directory/camera full of images to save space.
Code:
find . -iname "*.jpg" | xargs -l -i convert -quality 75 {} /tmp/output/{}
Saturday, April 10, 2010
Linux Slax Dial Up Modems Setup
Many people now use broadband Internet connections. However, some people use dial up modems, either because they are in a location where broadband is not available, or because it is less expensive. This section is included for people who use a dial up modem.
Modems
Some dial up modems work with Linux, others may not, particularly Winmodems. Most external modems work.
Kppp
When Slax is installed, Kppp is included.
Following is an explanation of how to set up Kppp using common options. In some situations the information which needs to be entered may be different. Enter information as appropriate for your situation.
Begin by clicking on "KPPP" in the menu to open it. You should find it under "Internet."
Click "Configure." You will get a new window.
Click "New." You will get a new window.
You can try "Wizard" and see if it works. Only some countries are included here. If your country is not included, you cannot set it up using this method. Let's use Manual Setup.
Click "Manual Setup." You will get a new window.
Click "Add." You will get a new window.
Enter the phone number your computer dials to connect to the Internet. Then click "OK." This will close this window and take you back to the previous one.
Enter the name of your Internet provider in the box following "Connection name." (You can enter anything here.)
Click "OK." This will close this window, and take you back to the previous one.
Click the tab "Modems."
Click "New."
Enter the name of your modem in the box following "Modem name." (You can enter anything here.)
The box following "Modem device" needs to set as appropriate for your modem. If you have an internal modem, leave it as "/dev/modem." If you have an external serial modem, it may be "/dev/ttyS0." If you are not sure, try different ones and see which works.
In the box following "Connection speed," change it to "115200."
Click "OK." This will close this window, and take you back to the previous one.
Click "OK" again. This will close this window, and take you back to the previous one.
In the box following "LoginID," enter the username you use to connect to the Internet.
In the box following "Password," enter the password you use to connect to the Internet.
You can now click "Connect," and connect to the Internet.
You can also click "Quit" to close it.
Monday, April 5, 2010
VLC media player for FEDORA 12
$> su -
#> rpm -ivh http://download1.rpmfusion.org/free/fedora/rpmfusion-free-release-stable.noarch.rpm
#> yum install vlc
#> yum install mozilla-vlc (optionnal)
#> rpm -ivh http://download1.rpmfusion.org/free/fedora/rpmfusion-free-release-stable.noarch.rpm
#> yum install vlc
#> yum install mozilla-vlc (optionnal)
Installing Compiz on Fedora 12
Installing Compiz on Fedora 12
Installing Compiz on Fedora 12 is not easy. First of all, due to compatibility issues with nouveau driver, additional steps are required to install and configure nvidia 3D driver. After resolving 3D driver issue, you need to modify Compiz configuration file so that your settings are captured. The installation procedure is the same for 32-bit/64-bit Fedora 12.
Installing Compiz
Issue the following command to install Compiz:
* #yum install emerald-themes compiz-fusion-extras emerald compiz-fusion compiz-manager compiz-fusion-extras-gnome gnome-compiz-manager libcompizconfig compiz-fusion-gnome ccsm
Configuring Compiz
CCSM Problem
You can change the settings using CompizConfig Settings Manager (ccsm) under System >> Preference. However, due to some bug, the changes in ccsm will not affect the system. To rectify this problem you need to change the script file for Compiz in /usr/bin/compiz-gtk
Once you open this file, change the following line from:
* exec compiz –ignore-desktop-hints glib gconf gnomecompat $@
to:
* exec compiz –ignore-desktop-hints glib gconf gnomecompat ccp $@
Enabling, Configuring and Using Compiz
You enabled Compiz by select System >> Preference >> Desktop Effect. Choose Compiz.
You can change the effects using System >> Preference >> CompizConfig Settings Manager
To rotate the Window Cube, press Ctrl+Alt and simultaneously use your mouse to rotate the window.
If you are new Linux user, it is recommended that you follow the step mentioned above.
Saturday, April 3, 2010
Radio Online Malaysia Dan Linux Rhythmbox
Bagi mereka yang suka mendengar radio pasti tidak melepaskan peluang mendengar radio online di Malaysia.
Tutorial.
1. Pergi ke Applications > Sound and Video > Rhythmbox Music Player.
2. Klik Radio pada sebelah kiri panel.
3. Tekan butang paling kanan sekali – Create new Internet radio – di bahagian toolbar.
4. Isikan mana-mana link di bawah pada ruangan di tetingkap yang muncul nanti.
5. Tekan Add.
6. Klik dua (2) kali pada nama link radio yang diletakkan tadi.
Berikut senarai link radio yang boleh digunakan pada Rhythmbox.
* Fly Fm – http://rs9.radiostreamer.com:11000/
* Hot Fm – http://rs9.radiostreamer.com:10000/
* One Fm – http://rs9.radiostreamer.com:12000/
* Era Fm – mms://rs5.radiostreamer.com/AMP_ERA
* Hitz Fm – mms://rs5.radiostreamer.com/AMP_HITZ
* Ikim Fm – http://210.48.148.126/ikim
* Mix Fm – mms://rs5.radiostreamer.com/AMP_MIX
* Red Fm – http://75.125.106.156:9000/;stream.nsv
* Sinar Fm – mms://rs5.radiostreamer.com/AMP_SINAR
* X-Fresh Fm – mms://rs5.radiostreamer.com/AMP_XFM
* Klasik Fm – http://mfile.akamai.com/24752/live/reflector:50934.asx
* Jazz Fm – http://tlrc.as34763.net/live.asx?station=jazz1
* My Fm – mms://rs5.radiostreamer.com/AMP_MYFM
* Kl Fm – http://mfile.akamai.com/24752/live/reflector:56151.asx
* Musik Fm – http://bkj-station4.jaring.my/muzikfm
* Radio 24 Fm – http://www.radio24.com.my/player/radio24.asx
* Suria Fm – mms://kl.cdn.tm.net.my/suriafm
* Minnal Fm – http://bkj-station1.jaring.my/minnalfm
* Express Tamil Online Radio Fm – http://www.extamil.com/radio
* Ai Fm – http://bkj-station4.jaring.my/aifm
* Mnet Fm – http://live.mnetfm.net:8080
* Nasyid Fm – http://nasyidfm.net/radio/listen.asx
* 988 Fm - http://75.125.106.155:8000
* Radio Sabah Fm – http://www.rtmsabah.gov.my/sabah_fm.asx
* Radio Sabah V Fm – http://www.rtmsabah.gov.my/sabah_v_fm.asx
* Labuan Fm – http://grace.fast-serv.com:9854
* Traxx Fm – http://bkj-station1.jaring.my/traxxfm
* Asyik Fm – http://bkj-station1.jaring.my/asyikfm
* Lite Fm – mms://rs5.radiostreamer.com/AMP_LITE
* THR Gegar Fm “permata pantai timur” – mms://rs5.radiostreamer.com/AMP_THRG
* THR Raaga Fm – mms://rs5.radiostreamer.com/AMP_THRR
* Fuhyoo Fm – http://78.129.245.212:32253
* Fungkur Fm – http://fungkurfm.mine.nu:8000
* Rilek Fm – http://67.220.76.198:8000
* Putra Fm – http://www.putrafm.upm.edu.my:8080
* Langkawi Fm – http://cybermedia.mmu.edu.my/ext/rml.asx
* Multimedia Unversiti Fm – http://cybermedia.mmu.edu.my/ext/rmmu.asx
* Selangor Fm – http://cybermedia.mmu.edu.my/ext/rms.asx
* Negeri Fm – http://cybermedia.mmu.edu.my/ext/rmns.asx
* Kedah Fm – http://60.51.214.210:8000/
* Perlis Fm – http://60.49.230.182:8000/
Cara-Cara Repair Grub
Ramai pengguna Linux yang masih menggunakan dual-boot antara Windows atau Mac memandangkan ada sesetengah aplikasi atau program yang hanya berfungsi pada OS tertentu sahaja.
Bagi yang menggunakan Windows pula kadangkala akan memformat kembali OS ini setelah terkena virus, keluar skrin biru (BSOD) atau ada ralat yang tak boleh diperbaiki akan juga memadam Menu GRUB yang dipasang Linux. Akhirnya, anda tidak dapat mengakses ke Linux walaupun partition dan failnya masih ada.
Ikuti tutorial di bawah untuk mengembalikannya. (Tutorial berdasarkan Ubuntu).
1. Boot PC anda dengan Ubuntu. Pilih Try Ubuntu without any change to you computer.
2. Klik Applications > Accessories > Terminal .
3. Taipkan sudo grub .
4. Taipkan find /boot/grub/stage1 . Ia akan mengeluarkan partition mana yang anda pasangkan GRUB sebelum ini.
5. Taipkan root (hd?,?) yang mana gantikan ? dengan nombor partition yang dinyatakan pada langkah 4. Contohnya root (hd0,1) .
6. Taipkan setup (hd0) .
7. Tutup Terminal dan mulai semula komputer.
Sunday, March 28, 2010
How to restore Grub boot loader after installing Windows
This tutorial will explain how to restore Grub after installing Windows 7/Vista/Xp.If you are using dual boot PC with windows,Ubuntu for some reason you reinstall your windows now you may not see your grub 2 is loading because your windows installation might have been over written MBR (Master boot record).
Method 1
Using Ubuntu 9.10 livecd
First you need to download Ubuntu from Ubuntu site
In this tutorial we are assuming the Ubuntu partition is sdc3,and /boot partition is sdc2
Note:- You need to replace sdc3,sdc2 with your partitions.You can check your partition table with fdisk -l
Now Boot up ubuntu from the livecd,open terminal from Applications menu -> Accessories -> Terminal and login as root using the following command
sudo -i
mount /dev/sdc3 /mnt
mount /dev/sdc2 /mnt/boot
grub-install --root-directory=/mnt/ /dev/sdc
If you are not having “grub.cfg” file,use following contents to recreate
mount --bind /proc /mnt/proc
mount --bind /dev /mnt/dev
mount --bind /sys /mnt/sys
chroot /mnt update-grub
umount /mnt/sys
umount /mnt/dev
umount /mnt/proc
exit
Method 2
Using GRUB for DOS
GRUB4DOS is an universal boot loader based on GNU GRUB. It can boot off DOS/LINUX, or via Windows boot manager/syslinux/lilo, or from MBR/CD. It also has builtin BIOS disk emulation, ATAPI CDROM driver, etc.
Download GRUB for DOS
For XP Users
copy the file grldr from grub4dos package to C:\.Edit boot.ini (hidden file) and add this line to the file:
c:\grldr=”grub4dos”
For Windows7/Vista Users
Copy the file grldr,grldr.mbr to C:\.Create boot.ini file in the root directory of C:,copy and paste following into this file.
[boot loader]
timeout=0
default=c:\grldr.mbr
[operating systems]
C:\grldr.mbr=”Grub4Dos”
Now,create menu.lst in root directory,with the following content
timeout 0
default 0
title grub2
find --set-root /boot/grub/core.img
kernel /boot/grub/core.img
boot
Now restart your computer,and select boot from Grub4Dos.Then select boot up Ubuntu in grub menu.
Once login,use this command to install grub into mbr
sudo grub-install /dev/sdc
Note :- Replace sdc with your partiton
Saturday, March 27, 2010
How To Use MEncoder
Install
First, ensure that the mencoder package is installed with all appropriate dependencies with
sudo apt-get install mencoder
You may also consider finding and install the w32codecs package, if you will be working with proprietary formats, such as wmv.
Basic Usage
To use mencoder, you must specify at least an input file, an output file, an audio encoder and a video encoder. As a general framework, you can use the following to convert a video from any type that mplayer can read, to an avi file using mp3 audio encoding.
mencoder -oac mp3lame -ovc lavc -o output_movie.avi
Audio/Video encoders
To see a list of audio encoders supported on your installation, run
mencoder -oac help
To use an audio encoder, specify it as in the example above with -oac.
Similarly for video encoders, search with
mencoder -ovc help
First, ensure that the mencoder package is installed with all appropriate dependencies with
sudo apt-get install mencoder
You may also consider finding and install the w32codecs package, if you will be working with proprietary formats, such as wmv.
Basic Usage
To use mencoder, you must specify at least an input file, an output file, an audio encoder and a video encoder. As a general framework, you can use the following to convert a video from any type that mplayer can read, to an avi file using mp3 audio encoding.
mencoder
Audio/Video encoders
To see a list of audio encoders supported on your installation, run
mencoder -oac help
To use an audio encoder, specify it as in the example above with -oac
Similarly for video encoders, search with
mencoder -ovc help
Friday, March 26, 2010
Convert RMVB To AVI Using LINUX Mencoder
In terminal just type this command
mencoder in.rmvb -oac mp3lame -lameopts preset=128 -ovc lavc -lavcopts vcodec=mpeg4:vbitrate=1200 -ofps 25 -of avi -o out.avi
in.rmvb means input file name
out.avi means output file name..
Hope this will work for you all..Thanks.
mencoder in.rmvb -oac mp3lame -lameopts preset=128 -ovc lavc -lavcopts vcodec=mpeg4:vbitrate=1200 -ofps 25 -of avi -o out.avi
in.rmvb means input file name
out.avi means output file name..
Hope this will work for you all..Thanks.
Wednesday, March 24, 2010
Riger DB102 Router Mode
Go to http://192.168.1.1.
* Username: tmadmin
* Password: tmadmin
Then you will see this above page. Go and click at the WAN Tab and click at PPP.
Set the new interface as:
* PPP interface = 0
* ATM VC = aal5-0
* Protocol = PPoE
* Use DNS = enable
* Security = PAP
Don’t forget to set your username as USERNAME@streamyx and also your TMNet Streamyx password. When done, click Submit.
Click on ATM VC and make sure interface are set as:
* aal5-0 VPI = 0
* VCI = 35
* MUX = LLC
* Max proto = 2
After that, click on Admin and then Commit and then Reboot Once it’s done you should check your Internet connectivity by loading your favorite website.
If you’re unable to go to 192.168.1.1, please make sure that your PC IP is in the range of 192.168.1.x.
Done!
Sunday, March 21, 2010
PPPoE Setup For Win XP
1.Go to Start, and Click Control Panel
2.In the Control Panel Window, Locate Network Connection and double click it.
3.You should now be in the "network connection" window.
4.In that window on the Left "Network Task" should have two option:
(a)Create a new connection
(b)Set up a home or small office network
Choose (a) Create a new connection
5.The New Connection Wizard will Pop-up
•Click Next
•Choose "connect to the internet" and Next.
•Choose "Set up my connection manually" and Next.
•Choose "Connect using a broadband connection that requires a user name
and password" and Hit Next.
•Type in Streamyx and click Next
•Fill the User name : eg, Streamyxuser@streamyx
Password : xxxxxxxxx
Confirm Password : xxxxxxxx
Leave the All the box checked Unless you have a Firewall Already running
eg. Zone alarm is installed, Be sure to UNCHECK
Turn on the internet Connection Firewall for this connection.
Click Next.
6.Check the Add a shortcut to this connection to my Desktop, and Click Finish
7.Click Connect, and you should be connected in 2 seconds.
How do I connect to Streamyx DSL with Linux?
How do I connect to Streamyx DSL with Linux?
Log in as root Go to a console.
Type 'adsl-setup'
It will do some system checks.
The next question will be for your user name. Type UserID@streamyx Hit 'enter'.
Next it will ask for the interface i.e. your NIC that you are using. Most likely 'eth0'. Unix starts with zero when it comes to assigning device numbers. eth0 is default, so just hit enter.
Next it will ask about 'Demand or Continuously'. Default is 'No'. Hit Enter.
Now it will ask you for your DNS's one at a time.
Type '202.188.1.5' for #1. Hit Enter.
Type '202.188.0.133' for #2. Hit Enter.
Next will be your UserID password.
Type it, hit enter, type it again to confirm, hit enter.
Next will be for firewalling. Press the number zero. Remember when you installed Red Hat, it asked you for high, medium, or low firewall. The firewall in the installation will be good enough. I had some trouble getting numbers 1 and 2 to work correctly in this selection. Maybe just me being a Linux newbie, but zero worked for me.
'Start connection at boot time?' Enter 'yes'.
Now it will show a summary of what you did and will ask you if you want to 'Accept these settings?' Enter 'y' for yes, hit 'Enter'
Next, type 'adsl-start' at the command line.
Now you should be online. Congrats.
Friday, March 19, 2010
How To Convert FLV To 3GP In Ubuntu
If you have a flv video format in your computer and want to convert it to 3gp so you can play this video in your cellphone, you can go to this tutorial step by step:
First you need ffmpeg, but in ubuntu it needs more some libraries to complete it. Try this command in your terminal :
sudo apt-get install ffmpeg
then add this command after it :
sudo aptitude install libavcodec-unstripped-51 libavdevice-unstripped-52 libavformat-unstripped-52 libavutil-unstripped-49 libpostproc-unstripped-51 libswscale-unstripped-0
After this installation complete, then you can use it to convert by this command :
ffmpeg -i fileInput.flv -s 176×144 -vcodec h263 -r 25 -b 200 -ab 64 -acodec mp3 -ac 1 -ar 8000 fileOutput.3gp
Note:-
1. -i means input and -o is output, you can see the configuration of resolution in this file
2. change the fileInput and fileOutput to the name of your target and destination file
Thursday, March 18, 2010
How To Convert .ogv to .avi File After RecordMyDesktop
Simple Method,in terminal type this command
mencoder input.ogv -ovc xvid -oac mp3lame -xvidencopts pass=1 -o output.avi
Note:-
I assume if ogv has no audio just leave out the '-oac mp3lame'
Another Big Poppa Pump Method is,You can do it with mencoder as forum people said.
I personally created a convenient ad-hoc command.
If you convert many files, you may want to do that as well. Do the following
1. create the file with an editor. Type:
gedit /usr/bin/ogv2avi
2. type the commands in the file:
#!/bin/bash
# ogv to avi
# Call this with multiple arguments
# for example : ls *.{ogv,OGV} | xargs ogv2avi
N=$#;
echo "Converting $N files !"
for ((i=0; i<=(N-1); i++))
do
echo "converting" $1
filename=${1%.*}
mencoder "$1" -ovc xvid -oac mp3lame -xvidencopts pass=1 -o $filename.avi
shift 1
done
3. save the file
4. make the file executable, type:
sudo chmod +x /usr/bin/ogv2avi
5. call the command with the syntax
ogv2avi file1.ogv file2.ogv file3.ogv
you can convert many files in one go !
A simple mencoder command line help
mecoder vob to avi well if you really want to learn how.
You will need to do a 2 pass encode or more either using xvid ,mpeg4 via lavc or x264 for video and libmp3lame for mp3 audio.
I can give you some examples for hq encodes
xvid
Code:
mencoder -oac mp3lame -lameopts cbr:br=128 -ovc xvid -xvidencopts pass=1 -o /dev/null
mencoder -oac mp3lame -lameopts cbr:br=128 -ovc xvid -xvidencopts pass=2:chroma_opt:vhq=4:bvhq=1:quant_type=mpeg:bitrate=900 -ofps 30000/1001 -o
mpeg4
Code:
mencoder -o /dev/null -oac mp3lame -lameopts cbr:br=128 -ovc lavc -ffourcc DX50 -lavcopts vcodec=mpeg4:vbitrate=900:vhq:vpass=1 -ofps 30000/1001 ; mencoder -o -oac mp3lame -lameopts cbr:br=128 -ovc lavc -ffourcc DX50 -lavcopts vcodec=mpeg4:vbitrate=900:vhq:vpass=2 -ofps 30000/1001
X264
Code:
mencoder -ovc x264 -x264encopts pass=1:turbo=1:nr=500:psnr -oac mp3lame -lameopts cbr:br=128 -ofps 30000/1001 -o /dev/null
mencoder -ovc x264 -x264encopts pass=2:nr=500:psnr:bitrate=900 -oac mp3lame -lameopts cbr:br=128 -ofps 30000/1001 -o
mencoder input.ogv -ovc xvid -oac mp3lame -xvidencopts pass=1 -o output.avi
Note:-
I assume if ogv has no audio just leave out the '-oac mp3lame'
Another Big Poppa Pump Method is,You can do it with mencoder as forum people said.
I personally created a convenient ad-hoc command.
If you convert many files, you may want to do that as well. Do the following
1. create the file with an editor. Type:
gedit /usr/bin/ogv2avi
2. type the commands in the file:
#!/bin/bash
# ogv to avi
# Call this with multiple arguments
# for example : ls *.{ogv,OGV} | xargs ogv2avi
N=$#;
echo "Converting $N files !"
for ((i=0; i<=(N-1); i++))
do
echo "converting" $1
filename=${1%.*}
mencoder "$1" -ovc xvid -oac mp3lame -xvidencopts pass=1 -o $filename.avi
shift 1
done
3. save the file
4. make the file executable, type:
sudo chmod +x /usr/bin/ogv2avi
5. call the command with the syntax
ogv2avi file1.ogv file2.ogv file3.ogv
you can convert many files in one go !
A simple mencoder command line help
mecoder vob to avi well if you really want to learn how.
You will need to do a 2 pass encode or more either using xvid ,mpeg4 via lavc or x264 for video and libmp3lame for mp3 audio.
I can give you some examples for hq encodes
xvid
Code:
mencoder
mencoder
mpeg4
Code:
mencoder -o /dev/null -oac mp3lame -lameopts cbr:br=128 -ovc lavc -ffourcc DX50 -lavcopts vcodec=mpeg4:vbitrate=900:vhq:vpass=1 -ofps 30000/1001
X264
Code:
mencoder
mencoder
Wednesday, March 17, 2010
How to Download iTunes in Linux Ubuntu
As you probably know, iTunes is a software written for Mac and Windows only, and does not work for Linux...or does it?Dont worry nWo Computer Linux are here,to guide you. There IS a way (100% proven and tested effective) to download iTunes on Linux Ubuntu, and here's just how to do it.
Step 1
Download WINE. WINE is a software written for Linux that allows it to run Windows software. You can download WINE through the terminal:
sudo dpkg -i wine_0.9.45~winehq0~ubuntu~7.04-1_i386.deb
Step 2
Next, you need to configure WINE to the options that we need. To do this, simply type in the terminal "winecfg". Follow these instructions:
-Choose the Windows XP option in the Applications tab.
-Select Autodetect in the Drivers tab.
-Check the ALSA Driver and uncheck the OSS Driver in the Audio tab.
Click OK. Your changes will be saved.
Step 3
As far as I know, the latest version of iTunes that can be downloaded on Linux Ubuntu is version 7.2. You can find a download of it here:
http://www.oldapps.com/itunes.php?old_itunes=20
NOTE: IF THIS LINK IS BROKEN BECAUSE OF FUTURE UPDATES, PLEASE LET ME KNOW. I SHALL EDIT THIS POST AND FIND ANOTHER LINK WHERE YOU CAN SUCCESSFULLY DOWNLOAD THIS. THANKS!!
Step 4
Once you have downloaded iTunes 7.2, go to the terminal once again and type
wine iTunesSetup.exe
Step 5
Welcome Screen
This will take you to a Welcome Screen.
Step 6
iTunes License
Accept the license.
Step 7
Installer Options
Select the installer options as seen in the picture.
Step 8
Autorun Popout
A popout will appear, asking for autorun.
CLICK NO!!!!
Step 9
Installing iTunes
The file will download.
Step 10
Click Finish.
Step 11
It took me a couple of gos, but I got it to work in the end. Once iTunes has been successfully installed, run the program using:
wine ~/.wine/drive_c/Program\ Files/iTunes/iTunes.exe
Step 12
And that's it! You now have iTunes installed on Linux Ubuntu. Congratulations!!
Tuesday, March 16, 2010
How to Transfer Music and Video to the iPhone
How could you live without tunes and pictures on your new toy, that cool iPhone? Easy to do, and quick too!
1
You may want to set the iPhone to not sync automatically to iTunes as this could give you too much of an overload of information at once, this way you can pick and choose what you want to put on it. You can also set iTunes to not sync right away with all iPhones since I bet your SO didn't let you get away without getting them one to, so you can do your separate loading with minimal problems!
#
2
To set it up to not sync automatically, Connect it to your computer and in iTunes click the Summary tab. Then un-check "Automatically Sync when this iPhone is connected." This stops iTunes from coming up when you connect iPhone. You can still start a sync manually.
#
Step 3
To Set it up to not sync for all iPhones, In iTunes choose iTunes then Preferences (on a Mac) or Edit then Preferences (on a PC), then un-check "Disable automatic syncing for all iPhones."
If this checkbox is selected, iPhone won't sync automatically, even if "Automatically sync"is selected in the Summary pane.
#
Step 4
OK, now you're ready! Click the Summary tab, then click Sync in the lower-right corner of the window. Or, if you've changed any sync settings, click Apply.
#
Step 5
Now go to the 'Music' pane. You can sync it to grab it all, or select your personal playlists and/or podcasts. It will load up and be ready to go! Anything Audio such as music video's or audiobooks will load here.
#
Step 6
Next go to the 'Video' pane. Same thing, pick and choose or load them all up!
#
Step 7
If you want to carry your photo albums, it is as simple as going to the 'Photo' pane and bringing them over as well. This is when you would need iPhoto 4.0.3 or later on a Mac, or with Adobe Photoshop Album 2.0 or later or Adobe Photoshop Elements 3.0 or later on a PC. If you have them formatted in a folder already that is not needed, just pull them over.
#
Step 8
Enjoy, but try to remember that other people may not like your choice of music (or just not want to listen to any music) and if you NEED to blast it, get good headphones, you can afford it since you can afford this phone, haha!
Friday, March 12, 2010
TURN YOUR UBUNTU TO MAC OSX LEOPARD

Disclaimer: This tutorial was based on Ubuntu Intrepid and Mac4Lin RC1 themes. I don’t guarantee that it will work on other distro or other version of Ubuntu.
Download the Mac4Lin themes and extract it to your Home folder. You should see a Mac4Lin_v1.0_RC1 folder that contains all the configuration files in your Home directory.
Preparing the installation path
Next, in your Home directory, press Ctrl + H to reveal all the hidden files. Check if any of the three folders .themes, .fonts, .emerald exist. If not, create three folders and name them .themes, .fonts, .emerald. Create another folder within .emerald folder and name it themes.
Installing the Mac4Lin themes
Open a terminal, type in:
cd Mac4Lin_v1.0_RC1
sh Mac4Lin_Install_v1.0_RC.sh
This will install the Gnome themes (window border and icons), change the wallpaper and the panel background.
During the installation process, the installer will ask you for root access in order to install certain components (refer to the image below). Type y to continue.

After the installation, your desktop should look something like this:

Installing the AWN dock
(The AWN dock may/may not work in all machine. If you find that it does not work after following the instructions below, you may want to try out Cairo dock that is less demanding on the machine.)
The AWN dock requires a compositing manager to work. If your system supports Compiz, it will be able to run AWN as well. if not, we have to install the X compositing manager.
Go to System -> Preferences -> Appearance, click on the Visual Effects tab. Click on the Extra radio button. If you see the following image, then your computer does not support Compiz. (If you don’t see the image below, proceed directly to install AWN.)

You have to install the alternative X composition manager
sudo apt-get install xcompmgr
Add it to your auto-start list. Go to System -> Preferences -> Session. Add the following:

Install AWN
The AWN dock is already included in the Intrepid repository, so you can easily install it by clicking this link. Alternatively, you can also type the following command in the terminal:
sudo apt-get install avant-window-navigator
Once the installation is done, go to Preferences -> AWN Manager. On the left pane, click on the Themes. On the right, click Add. Navigate to the Mac4Lin_v1.0_RC1 folder. Open up the AWN folder and select Mac4Lin_AWN_v1.0_RC.tar.gz. Click Open. The AWN theme should be installed now. Check the radio button beside the theme and click Apply. Click Close.

Before we launch the AWN, we need to remove the bottom panel so that there won’t be an overlap. At the bottom panel, right-click the mouse and select Delete This Panel. Activate AWN by going to Applications -> Accessories -> Avant Window Navigator. You should see the AWN loading up in the bottom of the screen. To add applications to the dock, click on the Applications at the top panel and navigate to the particular application you want to add. Drag the application icon to the dock. That’s it. You should see something like the image below:

To start AWN everytime you log in, go to System -> Preferences -> Sessions. Click Add. Fill up the following:

Click Add, follow by Close. AWN will now automatically load when you login to your computer.
Installing OSX font
Go to System -> Preferences -> Appearance. Click on the Fonts tab Change the following field to the same as the image below:

Make sure the Subpixel smoothing (LCDs) button is checked. Click Close.
Installing Global menu
There is a repository for Ubuntu Intrepid that you can add to the sources.list, but it is not the updated version (0.6) and it is buggy. Instead, we will download the latest version (0.7.1) from the code homepage. In the future when the repository is updated to the newer and more stable version, I will update this post again.
For 32-bit machine
Download gnome-globalmenu-0.7.1-1.fc10.i386.rpm to your Home folder from the Globalmenu Google code site.
Note that the file is of rpm format. We need to use alien to convert it to deb format.
In the terminal, type:
sudo apt-get install alien

sudo alien --scripts gnome-globalmenu-0.7.1-1.fc10.i386.rpm
This will create a gnome-globalmenu-0.7.1-1.fc10.i386.deb file in your Home folder. Double-click on the deb file to activate the installer. Click Install Package to install Globalmenu.

For 64-bit machine
# Uncomment to load the GTK module

export GTK_MODULES=globalmenu-gnome

# Uncomment to tell the GTK module to open a Gtk

# TreeView for all menus in the application you start.


# export GNOMENU_FUN=1

# Uncomment to disable global menu.

# export GNOMENU_DISABLED=1

# Uncomment to print a lot of debugging messages

# export GNOMENU_VERBOSE=1

# Uncomment to save the debugging messages to the given file.

# export GNOMENU_LOG_FILE=/tmp/gnomenu.log

# uncomment to disable the plugin for specific programs.

# export GTK_MENUBAR_NO_MAC="fast-user-switch-applet"
Save the file as .gnomerc in the Home folder.
In your terminal,
gksu gedit /etc/apt/sources.list
Add the following line to the end of the file. Save and close.
deb http://ppa.launchpad.net/globalmenu-team/ubuntu intrepid main
Back in your terminal,
sudo apt-get update
sudo apt-get install gnome2-globalmenu
Now, on the top panel, remove all the icons and menu from the left side of the panel. Right-click on the icon and select “Remove from panel”.
On the right of the top panel, remove the logout icon. Still on the right hand side of the top panel, right click and select ‘Add to panel‘. Scroll down the list and add ‘Search for files‘. This will add the spotlight icon to the panel.

On the left of the top panel, right click and select ‘Add to panel‘. Scroll down the list and add Main Menu and Global Menu Panel Applet.

The Globalmenu might not appear or work well after you have added it. Logout and login again and you should see the globalmenu working perfectly on the top panel.
Right click on the globalmenu and select Preferences. Check “Enable Global Menu” and unchecked “Icon”.


The globalmenu is compatible with most of the GTK application. However, some programs, such as Firefox will not work with it.
Creating Dashboard effect
We will use a combination of screenlets and Compiz widget plugin to achieve the dashboard effect.
If you have not installed Screenlets, click here to install.
If you have not installed Compiz Configuration Settings Manager, click here to install.
Alternatively, you can also type the following command in terminal to install:
sudo apt-get install screenlets compizconfig-settings-manager
Go to System->Preferences->CompizConfig Settings Manager. On the Left, click on Desktop. On the right, put a check beside ‘Widget layer’

Go to Applications –>Accessories->Screenlets. Activate the widgets that you want to display. Right click on the widget and select ‘Properties’. Go to Options tab and select ‘Treat as widget’. Do this for all the widgets that you have activated.

You can now see your dashboard in action by pressing F9.
Fixing up some small detail
Until now, your desktop should be very close to a Mac desktop, but there are still some small details such as the Gnome icon at the top panel, mouse cursor etc. Let’s fix them up now.
Replace the apple logo
1. Download the apple icon (Right-click and select “save link as”).
2. Go to Places –> Home Folder. Press Ctrl + H to reveal the hidden files.
3. Navigate to /.icons/Mac4Lin_Icons_v1.0_RC/scalable/places. Scroll down to find the images distributor-logo.png, gnome-main-menu.png, main-menu.png and start-here.png. Note that all of them are the same image. Rename them to distributor-logo.png.old, gnome-main-menu.png.old, main-menu.png.old and start-here.png.old respectively.
4. Now, with the apple icon that you have downloaded, make four copies and rename them to distributor-logo.png, gnome-main-menu.png, main-menu.png and start-here.png. Copy and paste all of them to the folder.
5. Logout and login again. The logo at the top panel should change to the apple icon now.
Changing mouse cursor
Go to System –> Preferences –> Appearance. Select Customize. Click on the Pointer tab. Select Mac4Lin_Cursors_v1.0_RC. Click Close.
Configuring usplash screen
Until now, you have done up the interior, it’s time to fix the exterior: usplash screen and grub screen.
Install startupmanager by clicking here or type the following command in the terminal:
sudo apt-get install startupmanager
Go to System -> Administration -> Startup-Manager. Click on the Appearance tab.

Press the Manage bootloader themes button. This will pop up a window allowing you to select the background image for the GRUB.

Click on the Add button and navigate to File System –> Home –> Username –> Mac4Lin_v1.0_RC1 –> GRUB. You should see three files. Refer to the below screenshots on how each file looks like. Pick the one that you like best.


Back to the main window, select the image from the drop down bar. Remember to check the box “Use background image for bootloader menu”.
There is a bug in Ubuntu Intrepid that prevent the user from changing the usplash screen. We have to do a workaround using splashy. Here’s the hack for it:
Remove the default usplash
sudo apt-get autoremove usplash
Download these two files to your desktop:
libsplashy1_0.3.10-1_i386.deb
splashy_0.3.10-1_i386.deb
Double-click the downloaded files to install.
Download the osx-splash splashy theme file to your Home folder.
In your terminal,
sudo splashy_config –i ~/osx-splash.tar.gz
sudo mv /etc/splashy/config.xml /etc/splashy/config.xml.old
sudo cp /etc/splashy/themes/osx-splash/config.xml /etc/splashy/config.xml
Now, we need to edit the GRUB file
gksu gedit /boot/grub/menu.lst
Scroll down till you find the kernel entry. Append the term vga=792 to the end of the kernel line (see screenshot below). Save and close.

That’s it.
Complete Screenshots
Grub screen

Login screen

Intrepid Mac OSX desktop

Intrepid Mac OSX desktop with dashboard effect

Uninstallation
If you want to change the theme back to the original setting, here is what you need to do:
1. Remove the globalmenu from the top panel
2. Remove all the installed files:
sudo apt-get autoremove splashy libsplashy1 gnome-globalmenu
3. Restore the usplash theme and remove the vga=792 from the GRUB file.
sudo apt-get install usplash
4. Uninstall the Mac4Lin themes
cd Mac4Lin_v1.0_RC
sh Mac4Lin_Uninstall_v1.0_RC.sh
Enjoy!
References: Ubuntu Forum, Splashy, Bauer-Power
Subscribe to:
Posts (Atom)