For all of his years in the spotlight at the helm of Apple, Steve Jobs in many ways remains an inscrutable figure — even in his death. Fiercely private, Jobs concealed most specifics about his personal life, from his curious family life to the details of his battle with pancreatic cancer — a disease that ultimately claimed him on Wednesday, at the age of 56.
While the CEO and co-founder of Apple steered most interviews away from the public fascination with his private life, there's plenty we know about Jobs the person, beyond the Mac and the iPhone. If anything, the obscure details of his interior life paint a subtler, more nuanced portrait of how one of the finest technology minds of our time grew into the dynamo that we remember him as today.
1. Early life and childhood
Jobs was born in San Francisco on February 24, 1955. He was adopted shortly after his birth and reared near Mountain View, California by a couple named Clara and Paul Jobs. His adoptive father — a term that Jobs openly objected to — was a machinist for a laser company and his mother worked as an accountant.
Later in life, Jobs discovered the identities of his estranged parents. His birth mother, Joanne Simpson, was a graduate student at the time and later a speech pathologist; his biological father, Abdulfattah John Jandali, was a Syrian Muslim who left the country at age 18 and reportedly now serves as the vice president of a Reno, Nevada casino. While Jobs reconnected with Simpson in later years, he and his biological father remained estranged.
2. College dropout
The lead mind behind the most successful company on the planet never graduated from college, in fact, he didn't even get close. After graduating from high school in Cupertino, California — a town now synonymous with 1 Infinite Loop, Apple's headquarters — Jobs enrolled in Reed College in 1972. Jobs stayed at Reed (a liberal arts university in Portland, Oregon) for only one semester, dropping out quickly due to the financial burden the private school's steep tuition placed on his parents.
In his famous 2005 commencement speech to Stanford University, Jobs said of his time at Reed: "It wasn't all romantic. I didn't have a dorm room, so I slept on the floor in friends' rooms, I returned coke bottles for the 5 cent deposits to buy food with, and I would walk the seven miles across town every Sunday night to get one good meal a week at the Hare Krishna temple."
3. Fibbed to his Apple co-founder about a job at Atari
Jobs is well known for his innovations in personal computing, mobile tech, and software, but he also helped create one of the best known video games of all-time. In 1975, Jobs was tapped by Atari to work on the Pong-like game Breakout.
He was reportedly offered $750 for his development work, with the possibility of an extra $100 for each chip eliminated from the game's final design. Jobs recruited Steve Wozniak (later one of Apple's other founders) to help him with the challenge. Wozniak managed to whittle the prototype's design down so much that Atari paid out a $5,000 bonus — but Jobs kept the bonus for himself, and paid his unsuspecting friend only $375, according to Wozniak's own autobiography.
4. The wife he leaves behind
Like the rest of his family life, Jobs kept his marriage out of the public eye. Thinking back on his legacy conjures images of him commanding the stage in his trademark black turtleneck and jeans, and those solo moments are his most iconic. But at home in Palo Alto, Jobs was raising a family with his wife, Laurene, an entrepreneur who attended the University of Pennsylvania's prestigious Wharton business school and later received her MBA at Stanford, where she first met her future husband.
For all of his single-minded dedication to the company he built from the ground up, Jobs actually skipped a meeting to take Laurene on their first date: "I was in the parking lot with the key in the car, and I thought to myself, 'If this is my last night on earth, would I rather spend it at a business meeting or with this woman?' I ran across the parking lot, asked her if she'd have dinner with me. She said yes, we walked into town and we've been together ever since."
In 1991, Jobs and Powell were married in the Ahwahnee Hotel at Yosemite National Park, and the marriage was officiated by Kobin Chino, a Zen Buddhist monk.
5. His sister is a famous author
Later in his life, Jobs crossed paths with his biological sister while seeking the identity of his birth parents. His sister, Mona Simpson (born Mona Jandali), is the well-known author of Anywhere But Here — a story about a mother and daughter that was later adapted into a film starring Natalie Portman and Susan Sarandon.
After reuniting, Jobs and Simpson developed a close relationship. Of his sister, he told a New York Times interviewer: "We're family. She's one of my best friends in the world. I call her and talk to her every couple of days.'' Anywhere But Here is dedicated to "my brother Steve."
6. Celebrity romances
In The Second Coming of Steve Jobs, an unauthorized biography, a friend from Reed reveals that Jobs had a brief fling with folk singer Joan Baez. Baez confirmed the the two were close "briefly," though her romantic connection with Bob Dylan is much better known (Dylan was the Apple icon's favorite musician). The biography also notes that Jobs went out with actress Diane Keaton briefly.
7. His first daughter
When he was 23, Jobs and his high school girlfriend Chris Ann Brennan conceived a daughter, Lisa Brennan Jobs. She was born in 1978, just as Apple began picking up steam in the tech world. He and Brennan never married, and Jobs reportedly denied paternity for some time, going as far as stating that he was sterile in court documents. He went on to father three more children with Laurene Powell. After later mending their relationship, Jobs paid for his first daughter's education at Harvard. She graduated in 2000 and now works as a magazine writer.
8. Alternative lifestyle
In a few interviews, Jobs hinted at his early experience with the psychedelic drug LSD. Of Microsoft founder Bill Gates, Jobs said: "I wish him the best, I really do. I just think he and Microsoft are a bit narrow. He'd be a broader guy if he had dropped acid once or gone off to an ashram when he was younger."
The connection has enough weight that Albert Hofmann, the Swiss scientist who first synthesized (and took) LSD, appealed to Jobs for funding for research about the drug's therapeutic use.
In a book interview, Jobs called his experience with the drug "one of the two or three most important things I have done in my life." As Jobs himself has suggested, LSD may have contributed to the "think different" approach that still puts Apple's designs a head above the competition.
Jobs will forever be a visionary, and his personal life also reflects the forward-thinking, alternative approach that vaulted Apple to success. During a trip to India, Jobs visited a well-known ashram and returned to the U.S. as a Zen Buddhist.
Jobs was also a pescetarian who didn't consume most animal products, and didn't eat meat other than fish. A strong believer in Eastern medicine, he sought to treat his own cancer through alternative approaches and specialized diets before reluctantly seeking his first surgery for a cancerous tumor in 2004.
9. His fortune
As the CEO of the world's most valuable brand, Jobs pulled in a comically low annual salary of just $1. While the gesture isn't unheard of in the corporate world — Google's Larry Page, Sergey Brin, and Eric Schmidt all pocketed the same 100 penny salary annually — Jobs has kept his salary at $1 since 1997, the year he became Apple's lead executive. Of his salary, Jobs joked in 2007: "I get 50 cents a year for showing up, and the other 50 cents is based on my performance."
In early 2011, Jobs owned 5.5 million shares of Apple. After his death, Apple shares were valued at $377.64 — a roughly 43-fold growth in valuation over the last 10 years that shows no signs of slowing down.
He may only have taken in a single dollar per year, but Jobs leaves behind a vast fortune. The largest chunk of that wealth is the roughly $7 billion from the sale of Pixar to Disney in 2006. In 2011, with an estimated net worth of $8.3 billion, he was the 110th richest person in the world, according to Forbes. If Jobs hadn't sold his shares upon leaving Apple in 1985 (before returning to the company in 1996), he would be the world's fifth richest individual.
While there's no word yet on plans for his estate, Jobs leaves behind three children from his marriage to Laurene Jobs (Reed, Erin, and Eve), as well as his first daughter, Lisa Brennan-Jobs.
[Image credit: Ben Stanfield, Heinrich Klaffs]
This article originally appeared on Tecca
More from Tecca:
A Life in Photos: The indelible impact of Steve Jobs The web's best tributes to Steve Jobs The incredible legacy of Steve Jobs: From the mouse to the iPad Remembering Steve Jobs in quotes
Saturday, October 8, 2011

Saturday, August 6, 2011
Make your Linux Online via Nimblex
Creating your own OS can be quite a daunting task that requires a lot of computer knowledge. I found a site that may interest you, Custom NimbleX2 is an open-source project that allows even newbies in computing to create their own Linux OS.
http://custom.nimblex.net/
Follow the on screen instructions to select background, software and so on. When you have finished designing your Linux, a live CD .iso file will be generated for you, just download it and burn it to disc. Boot from the disc and install your personal, newly created custom Linux.


http://custom.nimblex.net/
Follow the on screen instructions to select background, software and so on. When you have finished designing your Linux, a live CD .iso file will be generated for you, just download it and burn it to disc. Boot from the disc and install your personal, newly created custom Linux.


Sunday, May 22, 2011
Build RT3070 kernel module on Ubuntu 10.04 (Lucid Lynx)
The Ralink USB dongle wireless 802.11n driver install on Ubuntu 10.04 steps as below:
1. Download the driver for linux http://www.ralink.com.tw/support.php?s=2
click RT8070/RT3070USB(RT307x) and press Accept button.
2. Extract the file, open a terminal, cd into it and copy a missing file.
tar -xvf DPO_RT3070_LinuxSTA_V2.3.0.2_20100412.tar.bz2
cd DPO_RT3070_LinuxSTA_V2.3.0.2_20100412
cp RT2870STA.dat RT3070STA.dat
3. edit os/linux/usb_main_dev.c, add one line “MODULE_LICENSE(“GPL”);”. Please refers to http://www.linuxforums.org/forum/wireless-internet/161550-rt3070sta-module-license-unspecified-taints-kernel-solved.html
lsusb to check your id, add the ids into file common/rtusb_dev_id.c.
4. Compile and install the driver.
make (you’ll see one error that related “tftpboot”, ignore it.)
sudo make install
5. Add a missing symlink.
sudo mkdir /etc/Wireless/RT2870STA; sudo ln -s /etc/Wireless/RT3070STA/RT3070STA.dat /etc/Wireless/RT2870STA/RT2870STA.dat
6. Load the driver, if failed please rmmod rt2800usb related kernel modules.
sudo modprobe rt3070sta
7. edit file “/etc/modprobe.d/blacklist.conf”.
Add “blacklist rt2800usb” to the bottom line
After reboot you will use the WLAN well on Ubuntu 10.04, good luck!
1. Download the driver for linux http://www.ralink.com.tw/support.php?s=2
click RT8070/RT3070USB(RT307x) and press Accept button.
2. Extract the file, open a terminal, cd into it and copy a missing file.
tar -xvf DPO_RT3070_LinuxSTA_V2.3.0.2_20100412.tar.bz2
cd DPO_RT3070_LinuxSTA_V2.3.0.2_20100412
cp RT2870STA.dat RT3070STA.dat
3. edit os/linux/usb_main_dev.c, add one line “MODULE_LICENSE(“GPL”);”. Please refers to http://www.linuxforums.org/forum/wireless-internet/161550-rt3070sta-module-license-unspecified-taints-kernel-solved.html
lsusb to check your id, add the ids into file common/rtusb_dev_id.c.
4. Compile and install the driver.
make (you’ll see one error that related “tftpboot”, ignore it.)
sudo make install
5. Add a missing symlink.
sudo mkdir /etc/Wireless/RT2870STA; sudo ln -s /etc/Wireless/RT3070STA/RT3070STA.dat /etc/Wireless/RT2870STA/RT2870STA.dat
6. Load the driver, if failed please rmmod rt2800usb related kernel modules.
sudo modprobe rt3070sta
7. edit file “/etc/modprobe.d/blacklist.conf”.
Add “blacklist rt2800usb” to the bottom line
After reboot you will use the WLAN well on Ubuntu 10.04, good luck!
Thursday, May 19, 2011
Linux Backup: Hard Disk Clone with "dd"
Most of Windows users may know "Norton Ghost". Norton Ghost is a backup software for hard disks. It can backup a whole hard disk or a partition to an image file. Also, Norton Ghost can copy all the contents from a hard disk to another exactly. However, Norton Ghost is a Windows software, users on other operating system (such as Linux) can not enjoy its powerful function. Fortunately, most of Unix/Linux operating system provides a command line whose function is similar to Norton Ghost, it is called "dd".
In fact, "dd" is much powerful than Norton Ghost. You can use many arguments to control it. In this short article, we only concern on how to backup a whole hard disk or a partition.
Here, if=... sets the source and of=... sets the destination. "dd" doesn't care of the contents of the hard disk. It just reads bytes from /dev/sda and writes them into /dev/sdb. It doesn't know what are files. So, the hard disk file system and how many partitions it has are not important. For example, if /dev/sda is splitted into three partitions, the /dev/sdb will have the same partitions. i.e. "destination" is completely same with "source".
Notice: to execute "dd" you should login as "root" or switch to "root" using "su" command. And you must be careful, a small mistake may cause a serious problem!
dd if=disk2.img of=/dev/sda1
In fact, "dd" is much powerful than Norton Ghost. You can use many arguments to control it. In this short article, we only concern on how to backup a whole hard disk or a partition.
Hard Disk Clone
Suppose you have a 40GB hard disk and a removable hard disk whose capacity is 60GB, and you want to backup all the files from the hard disk to the removable disk. With "dd", it is a very easy task. Again, suppose your hard disk's Unix device name is /dev/sda and the removable disk is /dev/sdb. The following command can copy all the content from /dev/sda to /dev/sdb:dd if=/dev/sda of=/dev/sdb
Here, if=... sets the source and of=... sets the destination. "dd" doesn't care of the contents of the hard disk. It just reads bytes from /dev/sda and writes them into /dev/sdb. It doesn't know what are files. So, the hard disk file system and how many partitions it has are not important. For example, if /dev/sda is splitted into three partitions, the /dev/sdb will have the same partitions. i.e. "destination" is completely same with "source".
Notice: to execute "dd" you should login as "root" or switch to "root" using "su" command. And you must be careful, a small mistake may cause a serious problem!
Making a Hard Disk Image File
Most of time you don't want to make a complete duplication of your hard disk. You may prefer to creating an image file of the hard disk and save it in other storage devices. The following command will create an image file "disk1.img" in your user's directory from /dev/sda:dd if=/dev/sda of=~/disk1.img
Since you have created an image file, you can compress it with "gzip" or "bzip2":gzip disk1.img #generates disk1.img.gz or
bzip2 disk1.img #generates disk1.img.bz2
You can save much storage space with compression. But it will take very long time.Partition Clone
Backing up a hard disk partition is much similar to backing up a whole hard disk. The reason is that Unix/Linux uses device name, such as /dev/sda1, /dev/sda5... to indicate the partitions. For example, if you want to create an image file from the first partition of /dev/sda, use "dd" like this:dd if=/dev/sda1 of=~/disk2.img
Also, you can compress the image file:gzip disk2.img
By the way, you can copy a partition to another partition completely, just set "of" to the partition's device name. For example:dd if=/dev/sda1 of=/dev/sdb5
This command will copy all the contents from /dev/sda1 to /dev/sdb5. You must be sure that the capacity of /dev/sdb5 is larger than /dev/sda1.Restoring from an Image File
To restore a partition or a hard disk from an image file, just exchange the arguments "if" and "of". For example, restore the whole hard disk from the image file "disk1.img":dd if=disk1.img of=/dev/sda
Restore the first partition of /dev/sda from the image file "disk2.img":dd if=disk2.img of=/dev/sda1
Saturday, September 25, 2010
Remove Brontok Virus Yourself!!!
Start ur computer in safe mode with command prompt and type the followinf command to enable registry editor:-reg delete HKCU\software\microsoft\windows\currentversion\policies\system /v “DisableRegistryTools”
and run HKLM\software\microsoft\windows\currentversion\policies\system /v “DisableRegistryTools”
after this ur registry editor is enable
type explorer
go to run and type regedit
then follow the following path :-
HKLM\Software\Microsoft\Windows\Currentversion\Run
on the right side delete the entries which contain ‘Brontok’ and ‘Tok-’ words.
after that restart ur system
open registry editor and follow the path to enable folder option in tools menu
HKCU\Software\Microsoft\Windows\Currentversion\Policies\Explorer\ ‘NoFolderOption’
delete this entry and restart ur computer
and search *.exe files in all drives (search in hidden files also)
remove all files which are display likes as folder icon.
ur computer is completely free from virus brontok
and run HKLM\software\microsoft\windows\currentversion\policies\system /v “DisableRegistryTools”
after this ur registry editor is enable
type explorer
go to run and type regedit
then follow the following path :-
HKLM\Software\Microsoft\Windows\Currentversion\Run
on the right side delete the entries which contain ‘Brontok’ and ‘Tok-’ words.
after that restart ur system
open registry editor and follow the path to enable folder option in tools menu
HKCU\Software\Microsoft\Windows\Currentversion\Policies\Explorer\ ‘NoFolderOption’
delete this entry and restart ur computer
and search *.exe files in all drives (search in hidden files also)
remove all files which are display likes as folder icon.
ur computer is completely free from virus brontok
Make your Windows Xp Copy 100% Genuine!
Making your copy of windows genuine..works perfect making your copy of windows genuine many of you might have tried windows update and found out that your copy of windows is not genuine…here’s how to make your copy of windows genuine…download jellybean keyfinder from here:
http://www.magicaljellybean.com/beta/
Now open keyfinder.exe Click on options and click “change windows key”Now enter this key and you’re done.
*******************************************************
V2C47-MK7JD-3R89F-D2KXW-VPK3J
*******************************************************
http://www.magicaljellybean.com/beta/
Now open keyfinder.exe Click on options and click “change windows key”Now enter this key and you’re done.
*******************************************************
V2C47-MK7JD-3R89F-D2KXW-VPK3J
*******************************************************
Thursday, September 2, 2010
XP Installation – The 34 minute hiccup
You want to install XP professional and suddenly you realize that it freezes up at the mention of 34 minutes remaining! You try all your efforts to make it running but nothing seems to be working to your dismay. You try checking your RAM, checking for any bad sectors in your hard drive, even your motherboard (as I have done) but cannot make a conclusion as to what’s the answer to your woes.
So what is the solution to the defamed 34 minute XP installation hangup problem?
Its as simple as deleting a simple file which caused the installation to freeze.
So what is the solution to the defamed 34 minute XP installation hangup problem?
Its as simple as deleting a simple file which caused the installation to freeze.
- Let the XP hang up at 34 minutes remaining for the first time
- remove the CD from the CDROM and reboot
- Dont enter the CD when the installation asks for it, instead open the DOS prompt (Shift + F10)
- goto C:/Windows and type setupapi.log, hit enter
- The setupapi.log file opens in a notepad
- Scroll to the very last few lines in the file and search for the word “inf”
- You will notice that in the last few moments the installation created a file with the extension “.inf” before dying out (in my case it was the faulty modem for which XP created the file mdmcxpt.inf).
- It means that the device mentioned in the last few lines is faulty and you have to make the installation skip through it.
- Close the notepad and go to the folder C:/windows/inf in command prompt
- Browse through the files to find the “.inf” which was related to the faulty device.
- Straightaway delete the inf file (eg: del mdmcxpt.inf)
- now put in the XP installation CD and Continue the installation
Monday, August 23, 2010
Windows Tips And Tricks
This is an amazing trick to amaze your friends.By using this trick you can make your computer to speak whatever you type.This trick is working on all microsoft operating system and does not require any programming skills.You have to follow just simple steps and your own Text to Voice software will be ready.If you show this software to any of your friends he will be certainly impressed with you .
Ok,the trick is fairly simple and requires only 3 simple steps from your side.Let’s Begin the tutorial with screenshots to Make Your Computer Speak Whatever You Type
1.Open Notepad and copy and paste the following code into it
2.Now save the notepad file with the name speak.vbs at your desktop.
3.Now double click on speak.vbs type in the box whatever you want your computer to speak for you.
Ok,the trick is fairly simple and requires only 3 simple steps from your side.Let’s Begin the tutorial with screenshots to Make Your Computer Speak Whatever You Type
1.Open Notepad and copy and paste the following code into it
Dim message, sapi
 message=InputBox("What do you want me to say?","Speak to Me")
 Set sapi=CreateObject("sapi.spvoice")
 sapi.Speak message
2.Now save the notepad file with the name speak.vbs at your desktop.
3.Now double click on speak.vbs type in the box whatever you want your computer to speak for you.
Wednesday, August 18, 2010
Install JDownloader Via PPA Repository Ubuntu Lucid
JDownloader is a a java-based tool that completely automates the downloading process. It can be very helpful for websites such as Rapidshare.com or Megaupload.com for both premium and free users.
Among JDownloader features are: captcha recognition, multi-part downloads, tweak wait times, auto-reconnect, scheduler and even automatic file extraction. JDownloader has way too many features and plugins to list them here, so make sure you check it out if you haven't already!
I recently came across an Ubuntu Launchpad PPA repository for JDownloader and wanted to share it with everybody.
Once installed, you can find JDownloader under the Applications > Internet menu.
Installing JDownloader via the PPA isn't too much different than downloading it from it's website since a script automatically downloads and installs the latest JDownloader version in both cases (not 100% sure about this though), I found this as a great opportunity to remind you of JDownloader, which many consider to be the best download manager.
Among JDownloader features are: captcha recognition, multi-part downloads, tweak wait times, auto-reconnect, scheduler and even automatic file extraction. JDownloader has way too many features and plugins to list them here, so make sure you check it out if you haven't already!
I recently came across an Ubuntu Launchpad PPA repository for JDownloader and wanted to share it with everybody.
To add the JDownloader PPA, simply paste this in a terminal:
sudo add-apt-repository ppa:jd-team/jdownloader
Then, to install JDownloader:sudo apt-get update && sudo apt-get install jdownloader Once installed, you can find JDownloader under the Applications > Internet menu.
Installing JDownloader via the PPA isn't too much different than downloading it from it's website since a script automatically downloads and installs the latest JDownloader version in both cases (not 100% sure about this though), I found this as a great opportunity to remind you of JDownloader, which many consider to be the best download manager.
Saturday, August 14, 2010
How to connect to Streamyx with DLink 2640-T wireless router
I found in my website log, apparently somebody trying to find out how to connect to Streamyx broadband using the latest DLink 2640T. Since I own one, I decided to share my settings to enable you to connect to Streamyx.

Your Dlink wireless router should be able to connect to Streamyx broadband services now.
- First point your favorite browser to http://192.168.1.1/, enter your username and password (default: admin | admin)
- Web configuration user interface will be displayed, click WAN
- Change the VPI value from '8' to '0'
- Enter your Streamyx username and password below
- Finally go to Tools->System. Click "Save and Reboot" there to save your changes.
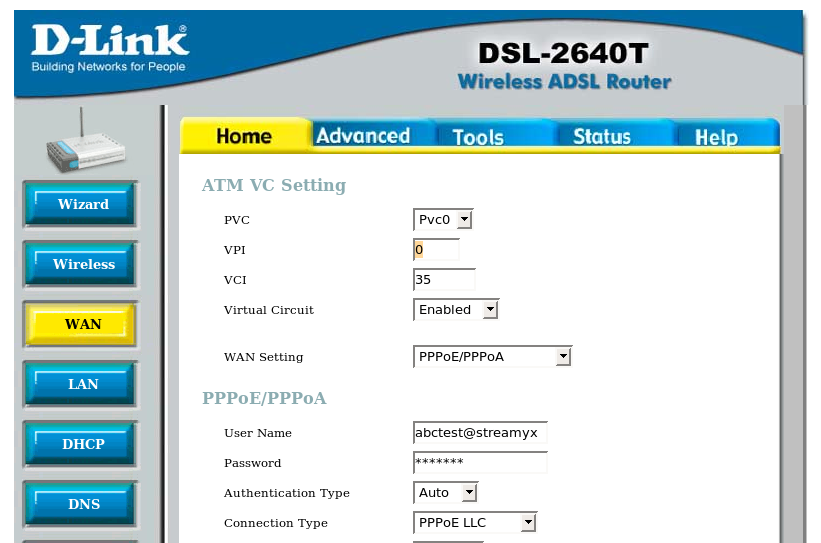
Your Dlink wireless router should be able to connect to Streamyx broadband services now.
Wednesday, July 14, 2010
Set A Static IP Address On Ubuntu 10.04 Lucid Lynx
It is not intuitively obvious how to assign Ubuntu 10.04 Lucid Lynx a a static IP address from the command line. However, much of Linux administration involves the editing of text files, and assigning a static IP address is no different. You’ll need to edit the following file:
/etc/network/interfaces
Initially, the file only contains information about your local loopback address:
auto lo
iface lo inet loopback
To assign a static IP address, you’ll need to make some changes to this file.
Let’s say you want to assign a static IP of 192.168.1.2 to your eth0 network connection (the first Ethernet adapter on your system; if you only have one, it will be eth0), with a subnet mask of 255.255.255.0 and a local gateway of 192.168.1.1. First, make a backup copy of the interfaces file:
sudo vi /etc/network/interfaces
(Obviously you can substitue emacs or your editor of choice.)
Once the file is open, add the following lines:
Once you’ve added these lines, save the interfaces file to disk, and exit your text editor. If you want to add a static DNS server, you’ll need to edit the /etc/resolv.conf file with this command:
sudo vi /etc/resolv.conf
To set a static DNS server with the address of 192.168.1.10, add this line to the file:
You’ll then to need have your system load the new IP configuration. You can do that by rebooting, but if that takes too long, you can use this command to force Ubuntu to re-read the configuration files:
Your system will then have a static IP address.
/etc/network/interfaces
Initially, the file only contains information about your local loopback address:
auto lo
iface lo inet loopback
To assign a static IP address, you’ll need to make some changes to this file.
Let’s say you want to assign a static IP of 192.168.1.2 to your eth0 network connection (the first Ethernet adapter on your system; if you only have one, it will be eth0), with a subnet mask of 255.255.255.0 and a local gateway of 192.168.1.1. First, make a backup copy of the interfaces file:
sudo cp /etc/network/interfaces ~
This will make a backup copy in your home directory in case something goes amiss during the editing process. Next, fire up a text editor:sudo vi /etc/network/interfaces
(Obviously you can substitue emacs or your editor of choice.)
Once the file is open, add the following lines:
iface eth0 inet static
address 192.168.1.2
netmask 255.255.252.0
gateway 192.168.1.1
address 192.168.1.2
netmask 255.255.252.0
gateway 192.168.1.1
Once you’ve added these lines, save the interfaces file to disk, and exit your text editor. If you want to add a static DNS server, you’ll need to edit the /etc/resolv.conf file with this command:
sudo vi /etc/resolv.conf
To set a static DNS server with the address of 192.168.1.10, add this line to the file:
nameserver 192.168.1.10
Save the file, and exit your text editor.You’ll then to need have your system load the new IP configuration. You can do that by rebooting, but if that takes too long, you can use this command to force Ubuntu to re-read the configuration files:
sudo ifup eth0
Your system will then have a static IP address.
Saturday, July 3, 2010
Ubuntu Networking Configuration Using Command Line
The basics for any network based on *nix hosts is the Transport Control Protocol/ Internet Protocol (TCP/IP) combination of three protocols. This combination consists of the Internet Protocol (IP),Transport Control Protocol (TCP), and Universal Datagram Protocol (UDP).
By Default most of the users configure their network card during the installation of Ubuntu. You can however, use the ifconfig command at the shell prompt or Ubuntu’s graphical network configuration tools, such as network-admin, to edit your system’s network device information or to add or remove network devices on your system
Configure Network Interface Using Command-Line
You can configure a network interface from the command line using the networking utilities. You configure your network client hosts with the command line by using commands to change your current settings or by editing a number of system files.
Configuring DHCP address for your network card
If you want to configure DHCP address you need to edit the /etc/network/interfaces and you need to enter the following lines replace eth0 with your network interface card
sudo vi /etc/network/interfaces
# The primary network interface – use DHCP to find our address
auto eth0
iface eth0 inet dhcp
Configuring Static IP address for your network card
If you want to configure Static IP address you need to edit the /etc/network/interfaces and you need to enter the following lines replace eth0 with your network interface card
sudo vi /etc/network/interfaces
sudo /etc/init.d/networking restart
If you are server system administrator or normal user some time you need to assign a second ipaddress to your Ubuntu machine.For this you need to edit the /etc/network/interfaces file and you need to add the following syntax.Below one is the only example you need to chnage according to your ip address settings
sudo vi /etc/network/interfaces
auto eth0:1
iface eth0:1 inet static
address 192.168.1.60
netmask 255.255.255.0
network x.x.x.x
broadcast x.x.x.x
gateway x.x.x.x
You need to enter all the details like address,netmask,network,broadcast and gateways values after entering all the values save this file and you need to restart networking services in debian using the following command to take effect of our new ipaddress.
After entering all the details you need to restart networking services using the following command
sudo /etc/init.d/networking restart
Setting your ubuntu system hostname
Setting up your hostname upon a ubuntu installation is very straightforward. You can directly query, or set, the hostname with the hostname command.
As an user you can see your current hostname with
sudo/bin/hostname
Example
To set the hostname directly you can become root and run
sudo /bin/hostname newname
When your system boots it will automatically read the hostname from the file /etc/hostname
If you want to know more about how to setup host name check here
Setting up DNS
When it comes to DNS setup Ubuntu doesn’t differ from other distributions. You can add hostname and IP address to the file /etc/hosts for static lookups.
To cause your machine to consult with a particular server for name lookups you simply add their addresses to /etc/resolv.conf.
For example a machine which should perform lookups from the DNS server at IP address 192.168.3.2 would have a resolv.conf file looking like this
enter the following details
search test.com
nameserver 192.168.3.2
By Default most of the users configure their network card during the installation of Ubuntu. You can however, use the ifconfig command at the shell prompt or Ubuntu’s graphical network configuration tools, such as network-admin, to edit your system’s network device information or to add or remove network devices on your system
Configure Network Interface Using Command-Line
You can configure a network interface from the command line using the networking utilities. You configure your network client hosts with the command line by using commands to change your current settings or by editing a number of system files.
Configuring DHCP address for your network card
If you want to configure DHCP address you need to edit the /etc/network/interfaces and you need to enter the following lines replace eth0 with your network interface card
sudo vi /etc/network/interfaces
# The primary network interface – use DHCP to find our address
auto eth0
iface eth0 inet dhcp
Configuring Static IP address for your network card
If you want to configure Static IP address you need to edit the /etc/network/interfaces and you need to enter the following lines replace eth0 with your network interface card
sudo vi /etc/network/interfaces
# The primary network interfaceAfter entering all the details you need to restart networking services using the following command
auto eth0
iface eth0 inet static
address 192.168.3.90
gateway 192.168.3.1
netmask 255.255.255.0
network 192.168.3.0
broadcast 192.168.3.255
sudo /etc/init.d/networking restart
If you are server system administrator or normal user some time you need to assign a second ipaddress to your Ubuntu machine.For this you need to edit the /etc/network/interfaces file and you need to add the following syntax.Below one is the only example you need to chnage according to your ip address settings
sudo vi /etc/network/interfaces
auto eth0:1
iface eth0:1 inet static
address 192.168.1.60
netmask 255.255.255.0
network x.x.x.x
broadcast x.x.x.x
gateway x.x.x.x
You need to enter all the details like address,netmask,network,broadcast and gateways values after entering all the values save this file and you need to restart networking services in debian using the following command to take effect of our new ipaddress.
After entering all the details you need to restart networking services using the following command
sudo /etc/init.d/networking restart
Setting your ubuntu system hostname
Setting up your hostname upon a ubuntu installation is very straightforward. You can directly query, or set, the hostname with the hostname command.
As an user you can see your current hostname with
sudo/bin/hostname
Example
To set the hostname directly you can become root and run
sudo /bin/hostname newname
When your system boots it will automatically read the hostname from the file /etc/hostname
If you want to know more about how to setup host name check here
Setting up DNS
When it comes to DNS setup Ubuntu doesn’t differ from other distributions. You can add hostname and IP address to the file /etc/hosts for static lookups.
To cause your machine to consult with a particular server for name lookups you simply add their addresses to /etc/resolv.conf.
For example a machine which should perform lookups from the DNS server at IP address 192.168.3.2 would have a resolv.conf file looking like this
sudo vi /etc/resolv.conf
enter the following details
search test.com
nameserver 192.168.3.2
Monday, June 7, 2010
How to start System Restore by using the Command prompt Win XP
Note You must be logged on to Windows with a user account that is a computer administrator to complete these steps. To verify that you are logged on to Windows with a user account that is a computer administrator.
Important If you have not previously set a restore point in System Restore, you cannot restore your computer to a previous state. If you are not sure, or if you have not previously set a restore point.
To start System Restore using the Command prompt, follow these steps:
Important If you have not previously set a restore point in System Restore, you cannot restore your computer to a previous state. If you are not sure, or if you have not previously set a restore point.
To start System Restore using the Command prompt, follow these steps:
- Restart your computer, and then press and hold F8 during the initial startup to start your computer in safe mode with a Command prompt.
- Use the arrow keys to select the Safe mode with a Command prompt option.
- If you are prompted to select an operating system, use the arrow keys to select the appropriate operating system for your computer, and then press ENTER.
- Log on as an administrator or with an account that has administrator credentials.
- At the command prompt, type %systemroot%\system32\restore\rstrui.exe, and then press ENTER.
- Follow the instructions that appear on the screen to restore your computer to a functional state.
Monday, May 31, 2010
youtube-dl: Download videos from YouTube.com
What is it?
youtube-dl is a small command-line program to download videos from YouTube.com. It requires the Python interpreter, version 2.x (x being at least 4), and it's not platform specific. It should work in your Unix box, in Windows or in Mac OS X. The latest version is 2010.04.04. It's released to the public domain, which means you can modify it, redistribute it or use it however you like.I'll try to keep it updated if YouTube.com changes the way you access their videos. After all, it's a simple and short program. However, I can't guarantee anything. If you detect it stops working, check for new versions and/or inform me about the problem, indicating the program version you are using. If the program stops working and I can't solve the problem but you have a solution, I'd like to know it. If that happens and you feel you can maintain the program yourself, tell me.ok.
Usage instructions
In Windows, once you have installed the Python interpreter, save the program with the .py extension and put it somewhere in the PATH. Try to follow the guide to install youtube-dl under Windows XP.In Unix, download it, give it execution permission and copy it to one of the PATH directories (typically, /usr/local/bin).
After that, you should be able to call it from the command line as youtube-dl or youtube-dl.py. I will use youtube-dl in the following examples. Usage instructions are easy. Use youtube-dl followed by a video URL or identifier. Example: youtube-dl "
http://www.youtube.com/watch?v=foobar". The video will be saved to the file foobar.flv in that example. As YouTube.com videos are in Flash Video format, their extension should be flv. In Linux and other unices, video players using a recent version of ffmpeg can play them. That includes MPlayer, VLC, etc. Those two work under Windows and other platforms, but you could also get a specific FLV player of your taste.If you try to run the program and you receive an error message containing the keyword SyntaxError near the end, it means your Python interpreter is too old.
More usage tips
- You can change the file name of the video using the -o option, like in youtube-dl -o vid.flv "
http://www.youtube.com/watch?v=foobar". Read the Output template section for more details on this. - Some videos require an account to be downloaded, mostly because they're flagged as mature content. You can pass the program a username and password for a YouTube.com account with the -u and -p options, like youtube-dl -u myusername -p mypassword "
http://www.youtube.com/watch?v=foobar". - The account data can also be read from the user .netrc file by indicating the -n or --netrc option. The machine name is youtube in that case.
- The simulate mode (activated with -s or --simulate) can be used to just get the real video URL and use it with a download manager if you prefer that option.
- The quiet mode (activated with -q or --quiet) can be used to supress all output messages. This allows, in systems featuring /dev/stdout and other similar special files, outputting the video data to standard output in order to pipe it to another program without interferences.
- The program can be told to simply print the final video URL to standard output using the -g or --get-url option.
- In a similar line, the -e or --get-title option tells the program to print the video title.
- The default filename is video_id.flv. But you can also use the video title in the filename with the -t or --title option, or preserve the literal title in the filename with the -l or --literal option.
- You can make the program append &fmt=something to the URL by using the -f or --format option. This makes it possible to download high quality versions of the videos when available.
- The -b or --best-quality option can be used to download the highest available quality version of any given video.
- The -m or --mobile-version option is an alias for -f 17.
- The -d or --high-def option is an alias for -f 22.
- Normally, the program will stop on the first error, but you can tell it to attempt to download every video with the -i or --ignore-errors option.
- The -a or --batch-file option lets you specify a file to read URLs from. The file must contain one URL per line.
- The program can be told not to overwrite existing files using the -w or --no-overwrites option.
- It can be told to attempt to continue interrupted downloads with the -c or --continue option.
- For YouTube, you can also use the URL of a playlist, and it will download all the videos in that playlist.
- For YouTube, you can also use the special word ytsearch to download search results. With ytsearch it will download the first search result. With ytsearchN, where N is a number, it will download the first N results. With ytsearchall it will download every result for that search. In most systems you'll need to use quotes for multiple words. Example: youtube-dl "ytsearch3:cute kittens".
- youtube-dl honors the http_proxy environment variable if you want to use a proxy. Set it to something like
http://proxy.example.com:8080, and do not leave thehttp://prefix out. - You can get the program version by calling it as youtube-dl -v or youtube-dl --version.
- For usage instructions, use youtube-dl -h or youtube-dl --help.
- You can cancel the program at any time pressing Ctrl+C. It may print some error lines saying something about KeyboardInterrupt. That's ok.
Output template
The -o option allows users to indicate a template for the output file names. The basic usage is not to set any template arguments when downloading a single file, like in youtube-dl -o funny_video.flv "http://some/video". However, it may contain special sequences that will be replaced when downloading each video. The special sequences have the format %(NAME)s. To clarify, that's a percent symbol followed by a name in parenthesis, followed by a lowercase S. Allowed names are:- id: The sequence will be replaced by the video identifier.
- url: The sequence will be replaced by the video URL.
- uploader: The sequence will be replaced by the nickname of the person who uploaded the video.
- title: The sequence will be replaced by the literal video title.
- stitle: The sequence will be replaced by a simplified video title, restricted to alphanumeric characters and dashes.
- ext: The sequence will be replaced by the appropriate extension (like flv or mp4).
- epoch: The sequence will be replaced by the Unix epoch when creating the file.
- ord: The sequence will be replaced by a five-digit number that will be increased with each download, starting at zero.
Tuesday, May 11, 2010
How to Format a Hard Drive in Linux Command Line
Preparation
3)Linux refers to hard drive
4)The examples given in this how-to are for a computer with two IDE hard drives attached as a master and slave. In this, the drives are "hda" and "hdb." You will need to determine the letter of the drive you want to format for your own setup. We will be formatting the drive hdb. For all examples, replace "hdb" with whatever your drive designation is.
5)You can see all the drives attached to your system by typing the command "ls /dev/hd*" or "ls /dev/sd*", depending on which type (IDE, SATA and so forth) the drives are. On the example system, the result of this command looks like "/dev/hda /dev/hda1 /dev/hda2 /dev/hdb /dev/hdb1". The operating system is installed on hda, which has two partitions (hda1 and hda2), and there is one partition on hdb and hdb1.
2)At the command prompt, type "fdisk /dev/hdb", replacing the "hdb" with the letters for your drive. Upon opening, fdisk may give you a couple of warnings, all of which can be ignored. It then gives you a prompt that looks like this: Command (m for help):
3)Enter "p" to see the partition table of the drive. The first line of output from the "p" command will also tell you the size of the drive. This is a good way to double-check that you are working with the correct drive.
4)If there are any partitions already on the drive, they will be listed as the last lines of the "p" command. On our example, this looks like "/dev/hdb1", followed by some information about the partition's size and filesystem.
5)To delete any existing partitions, press "d" and then "Enter." It will ask you which partition number you wish to delete. The number of the partition is the number that follows hdb, so on our example system, we enter 1. If there are multiple partitions, repeat the "d" command for each one. You can always view the partition table again with the "p" command.
6)Once you have deleted all existing partitions on the drive, you are ready to make a new one. Type "n" and hit "Enter." Then press "p" to create a primary partition. It asks you for a partition number; enter "1." Now you are asked which cylinder the partition should start at. The beginning of the drive is the default, so just hit "Enter." Then, you are asked for the last cylinder. The end of the drive is the default, so you can just press "Enter" again.
7)Now you are back at fdisk's command prompt. Use the "p" command to check the partition table. You should now see your new partition at the bottom of the output. In the example, it lists as "/dev/hdb1."
8)You now need to set the filesystem type for your new partition with the "t" command. You are asked for the Hex code of the filesystem you wish to use. We will use the standard Linux ext2 filesystem, which is "83." If you are doing something special and know of a particular filesystem that you need to use, you can press "L" to see all the codes, which are one or two characters made up of the numbers 0 to 9 and the letters a to f.
9)Now just issue the "w" command to write your new partition table and exit fdisk.
2)At the command prompt, enter "mkfs -t ext2 /dev/hdb1", while remembering to change the hdb1 to whatever the letters are for the partition you just created.
3)If you are using a different filesystem than ext2, you will have to specify that where "ext2" is in the above command.
2)At the command prompt, type "fsck -f -y /dev/hdb1", again replacing hdb1 with the letters and number for your partition.
3)After fsck runs, your new drive is formatted. Restart your system before using it.
4)If you reformatted your system drive, you will now need to boot off an installation disk to install an operating system.
1)When you format a computer hard drive, you will lose everything that is on the drive. Therefore, it is very important to back up anything you might later want.
2)To format a secondary drive, you will need root access. All commands used in this tutorial are run from a command line (terminal) as root. You may also want to make note of the size (total capacity in MB) of the drive.3)Linux refers to hard drive
4)The examples given in this how-to are for a computer with two IDE hard drives attached as a master and slave. In this, the drives are "hda" and "hdb." You will need to determine the letter of the drive you want to format for your own setup. We will be formatting the drive hdb. For all examples, replace "hdb" with whatever your drive designation is.
Using fdisk
1)First, you will use the fdisk command to erase any old partitions on the drive and create a new one. Any changes you make using fdisk are only made permanent if you then issue the "w" command before quitting, so feel free to play around a little if you like. If at any time you find yourself stuck, you can quit the program without saving changes by holding the "Ctrl" key and pressing "c."2)At the command prompt, type "fdisk /dev/hdb", replacing the "hdb" with the letters for your drive. Upon opening, fdisk may give you a couple of warnings, all of which can be ignored. It then gives you a prompt that looks like this: Command (m for help):
3)Enter "p" to see the partition table of the drive. The first line of output from the "p" command will also tell you the size of the drive. This is a good way to double-check that you are working with the correct drive.
4)If there are any partitions already on the drive, they will be listed as the last lines of the "p" command. On our example, this looks like "/dev/hdb1", followed by some information about the partition's size and filesystem.
5)To delete any existing partitions, press "d" and then "Enter." It will ask you which partition number you wish to delete. The number of the partition is the number that follows hdb, so on our example system, we enter 1. If there are multiple partitions, repeat the "d" command for each one. You can always view the partition table again with the "p" command.
6)Once you have deleted all existing partitions on the drive, you are ready to make a new one. Type "n" and hit "Enter." Then press "p" to create a primary partition. It asks you for a partition number; enter "1." Now you are asked which cylinder the partition should start at. The beginning of the drive is the default, so just hit "Enter." Then, you are asked for the last cylinder. The end of the drive is the default, so you can just press "Enter" again.
7)Now you are back at fdisk's command prompt. Use the "p" command to check the partition table. You should now see your new partition at the bottom of the output. In the example, it lists as "/dev/hdb1."
8)You now need to set the filesystem type for your new partition with the "t" command. You are asked for the Hex code of the filesystem you wish to use. We will use the standard Linux ext2 filesystem, which is "83." If you are doing something special and know of a particular filesystem that you need to use, you can press "L" to see all the codes, which are one or two characters made up of the numbers 0 to 9 and the letters a to f.
9)Now just issue the "w" command to write your new partition table and exit fdisk.
Creating the New Filesystem With mkfs
1)Now you need to create the filesystem on the drive. This is done with the "mkfs" command.2)At the command prompt, enter "mkfs -t ext2 /dev/hdb1", while remembering to change the hdb1 to whatever the letters are for the partition you just created.
3)If you are using a different filesystem than ext2, you will have to specify that where "ext2" is in the above command.
Finalizing the Format With fsck
1)All that is left is to run a check on the drive and enter it into your fstab so that the drive mounts each time you start your computer. This can be done with a single fsck command.2)At the command prompt, type "fsck -f -y /dev/hdb1", again replacing hdb1 with the letters and number for your partition.
3)After fsck runs, your new drive is formatted. Restart your system before using it.
4)If you reformatted your system drive, you will now need to boot off an installation disk to install an operating system.
Monday, May 3, 2010
Setting Up A Samba Server with Windows XP Clients
First Setting up the Smb Server:
1) For setting up samba server configure smb.conf file which is usually found under /etc/samba/ directory.Notes: After changing smb.conf always restart the samba server
Commands to be used:
./smbd stop
./smbd start
2) Changes to be done in the smb.conf file are
Notes:
a) Whenever you modify this file you should run the command "testparm" to check that you have not made any basic syntactic errors.
b) Read the smb.conf man page to understand the various parts of the file
In the Global section [global] the significant entries are:
[global]
logon drive = p: // Here you can set the drive letter
encrypt passwords = yes /* To allow only specific hosts who can connect to server below entry is used make sure localhost is added */
hosts allow = IP-address, 127.0.0.1/255.255.255.0
logon home = \\netbiosname\%U // home directories will be mounted as the user logs on.
passwd program = /usr/bin/passwd %u
wins support = yes //Enable the windows support
dns proxy = no
netbios name = wealhtheow //Set the netbiosname
netbios aliases = rch01 //Set the alias, this is optional
unix password sync = No //Sync the unix passwords
(Samba (actually 'smbd') makes use of the file 'smb.conf' to know about its configuration. During installation of samba, smb.conf is created in the directory '/etc/samba' by default. But in FreeBSD all the system configuration files are put in the directory /usr/local/etc/. There were two smb.conf files that were existing on this system and therefore a link was created from /etc/samba/smb.conf to the actual file used by FreeBSD which is /usr/local/etc/smb.conf. This was done to make sure that the Samba server uses the correct version of the configuration file. To resolve the passwords problem, the smb.conf file was modified to remove synchronization between the Samba and Unix passwords.)
logon path = \\rch01\profiles\%U // This will tell the server where to place the home directories
workgroup = rch.uky.edu // Workgroup to be used, all clients should have the same workgroup
os level = 64 // set the OS level
// Below entries are important in order to tell that Samba server is the domain controller
domain logons = yes
pam password change = yes
preferred master = yes
domain master = yes
local master = yes In the [homes] section the following entries are important :
[homes]
comment = Home Directories
browseable = no
writable = yes
valid users = %S
read only = no
create mode = 0600
directory mode = 0700 logon home = \\rch01\%U // This tells where is the home directory for the user
hide files = /*.pst/
In the [profiles] section the path variable tells where the profiles are to be placed and make sure the directories are created with right names
[profiles]
create mode = 0600
directory mode = 0700
path = /home/samba/profiles/
profile acls = yes
read only = no
writable = yes
Configuring the Windows XP Client:
Notes : Only Windows XP-Professional Edition can join the Domain, it does not work for WindowsXP-Home Edition.
STEPS:
1) Make sure that the workstation belonged to the same workgroup as the server and have a fixed IP address and hostname assigned.
2) Change the registry entry, run the command regedt32 and do the below
a) RequireSignOrSeal Registry hack
HKEY_LOCAL_MACHINE\SYSTEM\CurrentControlSet\Services\netlogon\parameters
"RequireSignOrSeal"=dword:00000000 b) Use the Registry Editor and edit the
HKEY_LOCAL_MACHINE\SOFTWARE\Policies\Microsoft\Windows\System\CompatibleRUPSecurity to have the DWORD value of 1
3) Use the Group Policy Editor (gpedit.msc) and enable "Computer Configuration\Administrative Templates\System\User Profiles\Do not check for user ownership of Roaming Profile Folders".
4) Go to MyComputer right click Properties. Go to Change and click on Domain and enter the domain-name you want to join. When joining the domain for the First time enter userid as root and give the samba password. Make sure there is an entry for the root in the smbpasswd (samba password) file.
5) Reboot and then the changes will be effective.
Sunday, May 2, 2010

Wednesday, April 21, 2010
ImageMagick
Introduction
ImageMagick is free software delivered as a ready-to-run binary distribution or as source code that you can freely use, copy, modify, and distribute. Its license is compatible with the GPL. It runs on all major operating systems.
The functionality of ImageMagick is typically utilized:
- from the command line or
- from programs written in your favorite programming language. Choose from these interfaces: MagickCore (C), MagickWand (C), ChMagick (Ch), Magick++ (C++), JMagick (Java), L-Magick (Lisp), PascalMagick (Pascal), PerlMagick (Perl), MagickWand for PHP (PHP), PythonMagick (Python), RMagick (Ruby), or TclMagick (Tcl/TK). With a language interface, use ImageMagick to modify or create images automagically and dynamically.
We point the interested reader to http://www.imagemagick.org for the full documentation, download and installation of the software.
Conversion of file formats
The command line tool to convert from one graphics format to another is convert. The basic usage is straight forward:convert Ashwinie_Jassvendra.png Ashwinie_Jassvendra.jpgThe convert command guesses the required format from the filename extension (i.e. from png to jpg).

Ashwinie_Jassvendra.png
Identifying image types
The identify command allows quick identification of image files:
Jassvendra@slax:~# identify Ashwinie_Jassvendra.png
Ashwinie_Jassvendra.png PNG 632x474 632x474+0+0 8-bit
DirectClass 815KB 0.040u 0:00.039 Ashwinie_Jassvendra.png PNG 632x474 632x474+0+0 8-bit
Jassvendra@slax:~# identify Ashwinie_Jassvendra.jpg
Ashwinie_Jassvendra.jpg JPEG 632x474 632x474+0+0 8-bit
Ashwinie_Jassvendra.jpg JPEG 632x474 632x474+0+0 8-bit
DirectClass 65.6KB 0.000u 0:00.000
Changing the size
First, we'll make the image we have somewhat smaller. For example, suppose we would like to limit it to 250 pixel in the x-direction:
convert -geometry 250 Ashwinie_Jassvendra.png small_Ashwinie_Jassvendra.pngThe number of pixels in the other direction (i.e. y) will be chosen such that the proportions of the image are preserved:
Jassvendra@slax:~# identify small_Ashwinie_Jassvendra.png
small_Ashwinie_Jassvendra.png PNG 250x188 250x188+0+0 8-bit DirectClass 104KB 0.020u 0:00.019
Here is the smaller image:

Adding a frame
Actually, the size of the image would be better visible if we had a frame around the image. Here is the command to create a frame of 2 pixels in color black:
convert -geometry 250 -border 2 -bordercolor black small_Ashwinie_Jassvendra.png small_frame.png
Adding labels
There is a multitude of possible ways to add labels to a picture. One is to use the montage command line utility which can create a montage by putting together several pictures. This is often used to create index thumbnail pages for directories with many pictures. Here, we put together our normal image, and a piece of text ("Jassvendra The Hero"):
Jassvendra@slax:~# montage -geometry +0+0 -background skyblue -label "Jassvendra The Hero" small_Ashwinie_Jassvendra.png small_label.pngwhich results in this picture

ImageMagick has a number of quite sophisticated image processing options which includes the polaroid switch:
Jassvendra@slax:~# convert -caption "Jassvendra The Hero Polaroid" small.png -gravity center -background black +polaroid small_polaroid.png

Labeling on top of the Image itself
The problem with writing text directly on a picture is that you can't be sure the text will be readable in the color you have chosen. The image being drawn onto could be black, white or a rainbow of colors.
Outlined Label: The simplest method is to draw the string with a outline to separate the text from the image. However as the "-stroke" font setting adds thickness to a font both inward and outward, it is a good idea to draw the text twice.Jassvendra@slax:~# convert 06.jpg -gravity south -stroke '#000C' -strokewidth 2 -annotate 0 'nWo Computer LINUX' -stroke none -fill white -annotate 0 'nWo Computer LINUX' nwo.jpg

As you can see it works, but not very well. It does work better with a thicker font, than the default '
Times' or 'Arial' font. The more classical method to make the annotated text more visible is to 'dim" the image in the area the text will be added, then draw the text in the opposite color.Draw Dim Box: ImageMagick has the ability to draw transparent colors. This can be very useful to create a box to draw the text into.
Jassvendra@slax:~# convert 06.jpg -fill white -undercolor '#00000080' -gravity South -annotate +0+5 ' nWo Computer LINUX ' nwo03.jpg

Please visit http://www.imagemagick.org/Usage/annotating for a lengthy list of examples.
Saturday, April 17, 2010
ImageMagick Tutorial
How To ...
Format Conversion
Convert from gif to png.
convert p1.gif p2.png
Convert from png to jpg. Use “-quality” for compression/quality.
convert -scale 50% -quality 80% old.png new.jpg
Scaling and Cropping
Scale a image.
convert -scale 50% old.gif new.png
Autocrop border
convert -trim cat.png cat.png
Cropping (cutting) a image.
convert -crop 853x368+0+56 old.png new.png
The 853 and 368 would be the new image's width and height. The 0 is the offset on x-axis, and 56 is the offset of y-axis. The x and y axes's origin starts at the upper left corner.
To crop by specifying percentage of sides to cut, use “-shave”.
Color, Brightness, Saturation...
Increase brightness.
convert -modulate 150,100,100 old.png new.png
The above increase brightness by the multiplier 150%. To decrease, use values less than 100. The full argument to modulate are 3 numbers in the form “x,y,z”. The x is the brightness. The y is the saturation. The z is the hue. They are all interpreted as percentages.
Increase saturation.
convert -modulate 100,130,100 old.png new.png
The above increase color saturation by the multiplier 130%. To decrease, use values less than 100.
Color, bits per pixel, file size.
Change color image to gray scale.
convert -type Grayscale old.png new.png
Note: this does not necessarily force image format use indexed color to reduce size.
Reduce bits per pixel.
Use “-depth”. In particular, for a grayscale line art in png, you can do: convert -depth 8 old.png new.png. That makes it 8 bits. For clean black and white line art, you can use “-depth 2”. This is great for reducing file size. (see also “-colors”)
Reduce color.
convert -dither -colors 256 old.png new.png.
To reduce color without dithering, use “+dither” in place of “-dither”. Note that reducing colors does not necessarily reduce file size.
Image Filtering
Sharpen a image.
convert -sharpen 2 old.png new.png
Blur a image.
convert -blur 1 old.png new.png
Image Editing
Insert copyright notice.
convert -fill red -draw 'text 20 20 "© 2006 XahLee.org"' old.png new.png
Use -gravity SouthEast -font helvetica to put the text in other corners, and change font.
Flip and Rotate
How to rotate a image?
convert -rotate 90 x.png x.png. Positive degree means counter-clockwise.
How to flip a image?
To mirror it along a vertical line, use convert -flop x.png x.png. To mirror it alone a horizontal line, use “-flip”.
Batch Processing
Batch processing.
There are many ways to process all files in a directory in one shot. You can use the unix shell utils “find” and “xargs”, or write a bash shell script, or use Perl, Python, emacs.
Suppose you want to convert all files in a dir from png to jpg.
unix shell solution (programs assume GNU version):
find . -name "*png" | xargs -l -i basename -s ".png" "{}" | xargs -l -i convert -quality 85% "{}.png" "{}.jpg"
The “-l” makes it process one line at a time. The “-i” makes the “{}” to stand for file name. The “basename -s” strips the suffix.
To use emacs, basically you create a temp file temp.sh, and fill out this file with command lines like “convert p1.png p1.jpg”, “convert p2.png p2.jpg”, ..., then execute this file as shell script. The emacs commands to do this are:
“Ctrl+x Ctrl+f temp.sh” to create a file, “Ctrl+u Alt+! ls *png” to insert a list of png files. Type “Ctrl+Alt+%” then “\(.+\)\.png” and “convert \1.png \1.jpg” to replace each image file to the right command string. Then “Alt+! sh temp.sh” to execute the file as shell script. Also, the commands string-rectangle (Ctrl+x r t) and kill-rectangle (Ctrl+x r k) are helpful, because they let you cut/insert a column of text. For more emacs tips, see: Emacs and Unix Tips.
For Perl and Python solutions, see Making System Calls in Perl and Python.
Misc
Other options to explore:
* -annotate
* -comment
* -contrast-stretch
* -black-threshold
* -white-threshold
* -level
* -modulate
* -monochrome
* -normalize
* -quantize
* -blur
* -radial-blur
* -adaptive-blur
* -unsharp
* -adaptive-resize
* -adaptive-sharpen
* -despeckle
* -dither
* -enhance
* -equalize
* -gaussian
* -antialias
A complete tutorial with examples: http://www.imagemagick.org/Usage/.
Format Conversion
Convert from gif to png.
convert p1.gif p2.png
Convert from png to jpg. Use “-quality” for compression/quality.
convert -scale 50% -quality 80% old.png new.jpg
Scaling and Cropping
Scale a image.
convert -scale 50% old.gif new.png
Autocrop border
convert -trim cat.png cat.png
Cropping (cutting) a image.
convert -crop 853x368+0+56 old.png new.png
The 853 and 368 would be the new image's width and height. The 0 is the offset on x-axis, and 56 is the offset of y-axis. The x and y axes's origin starts at the upper left corner.
To crop by specifying percentage of sides to cut, use “-shave”.
Color, Brightness, Saturation...
Increase brightness.
convert -modulate 150,100,100 old.png new.png
The above increase brightness by the multiplier 150%. To decrease, use values less than 100. The full argument to modulate are 3 numbers in the form “x,y,z”. The x is the brightness. The y is the saturation. The z is the hue. They are all interpreted as percentages.
Increase saturation.
convert -modulate 100,130,100 old.png new.png
The above increase color saturation by the multiplier 130%. To decrease, use values less than 100.
Color, bits per pixel, file size.
Change color image to gray scale.
convert -type Grayscale old.png new.png
Note: this does not necessarily force image format use indexed color to reduce size.
Reduce bits per pixel.
Use “-depth”. In particular, for a grayscale line art in png, you can do: convert -depth 8 old.png new.png. That makes it 8 bits. For clean black and white line art, you can use “-depth 2”. This is great for reducing file size. (see also “-colors”)
Reduce color.
convert -dither -colors 256 old.png new.png.
To reduce color without dithering, use “+dither” in place of “-dither”. Note that reducing colors does not necessarily reduce file size.
Image Filtering
Sharpen a image.
convert -sharpen 2 old.png new.png
Blur a image.
convert -blur 1 old.png new.png
Image Editing
Insert copyright notice.
convert -fill red -draw 'text 20 20 "© 2006 XahLee.org"' old.png new.png
Use -gravity SouthEast -font helvetica to put the text in other corners, and change font.
Flip and Rotate
How to rotate a image?
convert -rotate 90 x.png x.png. Positive degree means counter-clockwise.
How to flip a image?
To mirror it along a vertical line, use convert -flop x.png x.png. To mirror it alone a horizontal line, use “-flip”.
Batch Processing
Batch processing.
There are many ways to process all files in a directory in one shot. You can use the unix shell utils “find” and “xargs”, or write a bash shell script, or use Perl, Python, emacs.
Suppose you want to convert all files in a dir from png to jpg.
unix shell solution (programs assume GNU version):
find . -name "*png" | xargs -l -i basename -s ".png" "{}" | xargs -l -i convert -quality 85% "{}.png" "{}.jpg"
The “-l” makes it process one line at a time. The “-i” makes the “{}” to stand for file name. The “basename -s” strips the suffix.
To use emacs, basically you create a temp file temp.sh, and fill out this file with command lines like “convert p1.png p1.jpg”, “convert p2.png p2.jpg”, ..., then execute this file as shell script. The emacs commands to do this are:
“Ctrl+x Ctrl+f temp.sh” to create a file, “Ctrl+u Alt+! ls *png” to insert a list of png files. Type “Ctrl+Alt+%” then “\(.+\)\.png” and “convert \1.png \1.jpg” to replace each image file to the right command string. Then “Alt+! sh temp.sh” to execute the file as shell script. Also, the commands string-rectangle (Ctrl+x r t) and kill-rectangle (Ctrl+x r k) are helpful, because they let you cut/insert a column of text. For more emacs tips, see: Emacs and Unix Tips.
For Perl and Python solutions, see Making System Calls in Perl and Python.
Misc
Other options to explore:
* -annotate
* -comment
* -contrast-stretch
* -black-threshold
* -white-threshold
* -level
* -modulate
* -monochrome
* -normalize
* -quantize
* -blur
* -radial-blur
* -adaptive-blur
* -unsharp
* -adaptive-resize
* -adaptive-sharpen
* -despeckle
* -dither
* -enhance
* -equalize
* -gaussian
* -antialias
A complete tutorial with examples: http://www.imagemagick.org/Usage/.
ImageMagick resize Image
ImageMagick has some pretty cool commandline tools to manage images. Specifically I wanted to resize an image (make it smaller).
Code:
convert -resize 50% -quality 80 input.jpg output.jpg
You can change resize to a pixel size also: 800x600. Pretty handy and quick. Update: You can resize/recompress and entire directory of images using find and xargs. This works good if you need to resize an entire directory/camera full of images to save space.
Code:
find . -iname "*.jpg" | xargs -l -i convert -quality 75 {} /tmp/output/{}
Code:
convert -resize 50% -quality 80 input.jpg output.jpg
You can change resize to a pixel size also: 800x600. Pretty handy and quick. Update: You can resize/recompress and entire directory of images using find and xargs. This works good if you need to resize an entire directory/camera full of images to save space.
Code:
find . -iname "*.jpg" | xargs -l -i convert -quality 75 {} /tmp/output/{}
Subscribe to:
Posts (Atom)