Start ur computer in safe mode with command prompt and type the followinf command to enable registry editor:-reg delete HKCU\software\microsoft\windows\currentversion\policies\system /v “DisableRegistryTools”
and run HKLM\software\microsoft\windows\currentversion\policies\system /v “DisableRegistryTools”
after this ur registry editor is enable
type explorer
go to run and type regedit
then follow the following path :-
HKLM\Software\Microsoft\Windows\Currentversion\Run
on the right side delete the entries which contain ‘Brontok’ and ‘Tok-’ words.
after that restart ur system
open registry editor and follow the path to enable folder option in tools menu
HKCU\Software\Microsoft\Windows\Currentversion\Policies\Explorer\ ‘NoFolderOption’
delete this entry and restart ur computer
and search *.exe files in all drives (search in hidden files also)
remove all files which are display likes as folder icon.
ur computer is completely free from virus brontok
Saturday, September 25, 2010

Make your Windows Xp Copy 100% Genuine!
Making your copy of windows genuine..works perfect making your copy of windows genuine many of you might have tried windows update and found out that your copy of windows is not genuine…here’s how to make your copy of windows genuine…download jellybean keyfinder from here:
http://www.magicaljellybean.com/beta/
Now open keyfinder.exe Click on options and click “change windows key”Now enter this key and you’re done.
*******************************************************
V2C47-MK7JD-3R89F-D2KXW-VPK3J
*******************************************************
http://www.magicaljellybean.com/beta/
Now open keyfinder.exe Click on options and click “change windows key”Now enter this key and you’re done.
*******************************************************
V2C47-MK7JD-3R89F-D2KXW-VPK3J
*******************************************************
Thursday, September 2, 2010
XP Installation – The 34 minute hiccup
You want to install XP professional and suddenly you realize that it freezes up at the mention of 34 minutes remaining! You try all your efforts to make it running but nothing seems to be working to your dismay. You try checking your RAM, checking for any bad sectors in your hard drive, even your motherboard (as I have done) but cannot make a conclusion as to what’s the answer to your woes.
So what is the solution to the defamed 34 minute XP installation hangup problem?
Its as simple as deleting a simple file which caused the installation to freeze.
So what is the solution to the defamed 34 minute XP installation hangup problem?
Its as simple as deleting a simple file which caused the installation to freeze.
- Let the XP hang up at 34 minutes remaining for the first time
- remove the CD from the CDROM and reboot
- Dont enter the CD when the installation asks for it, instead open the DOS prompt (Shift + F10)
- goto C:/Windows and type setupapi.log, hit enter
- The setupapi.log file opens in a notepad
- Scroll to the very last few lines in the file and search for the word “inf”
- You will notice that in the last few moments the installation created a file with the extension “.inf” before dying out (in my case it was the faulty modem for which XP created the file mdmcxpt.inf).
- It means that the device mentioned in the last few lines is faulty and you have to make the installation skip through it.
- Close the notepad and go to the folder C:/windows/inf in command prompt
- Browse through the files to find the “.inf” which was related to the faulty device.
- Straightaway delete the inf file (eg: del mdmcxpt.inf)
- now put in the XP installation CD and Continue the installation
Monday, August 23, 2010
Windows Tips And Tricks
This is an amazing trick to amaze your friends.By using this trick you can make your computer to speak whatever you type.This trick is working on all microsoft operating system and does not require any programming skills.You have to follow just simple steps and your own Text to Voice software will be ready.If you show this software to any of your friends he will be certainly impressed with you .
Ok,the trick is fairly simple and requires only 3 simple steps from your side.Let’s Begin the tutorial with screenshots to Make Your Computer Speak Whatever You Type
1.Open Notepad and copy and paste the following code into it
2.Now save the notepad file with the name speak.vbs at your desktop.
3.Now double click on speak.vbs type in the box whatever you want your computer to speak for you.
Ok,the trick is fairly simple and requires only 3 simple steps from your side.Let’s Begin the tutorial with screenshots to Make Your Computer Speak Whatever You Type
1.Open Notepad and copy and paste the following code into it
Dim message, sapi
 message=InputBox("What do you want me to say?","Speak to Me")
 Set sapi=CreateObject("sapi.spvoice")
 sapi.Speak message
2.Now save the notepad file with the name speak.vbs at your desktop.
3.Now double click on speak.vbs type in the box whatever you want your computer to speak for you.
Wednesday, August 18, 2010
Install JDownloader Via PPA Repository Ubuntu Lucid
JDownloader is a a java-based tool that completely automates the downloading process. It can be very helpful for websites such as Rapidshare.com or Megaupload.com for both premium and free users.
Among JDownloader features are: captcha recognition, multi-part downloads, tweak wait times, auto-reconnect, scheduler and even automatic file extraction. JDownloader has way too many features and plugins to list them here, so make sure you check it out if you haven't already!
I recently came across an Ubuntu Launchpad PPA repository for JDownloader and wanted to share it with everybody.
Once installed, you can find JDownloader under the Applications > Internet menu.
Installing JDownloader via the PPA isn't too much different than downloading it from it's website since a script automatically downloads and installs the latest JDownloader version in both cases (not 100% sure about this though), I found this as a great opportunity to remind you of JDownloader, which many consider to be the best download manager.
Among JDownloader features are: captcha recognition, multi-part downloads, tweak wait times, auto-reconnect, scheduler and even automatic file extraction. JDownloader has way too many features and plugins to list them here, so make sure you check it out if you haven't already!
I recently came across an Ubuntu Launchpad PPA repository for JDownloader and wanted to share it with everybody.
To add the JDownloader PPA, simply paste this in a terminal:
sudo add-apt-repository ppa:jd-team/jdownloader
Then, to install JDownloader:sudo apt-get update && sudo apt-get install jdownloader Once installed, you can find JDownloader under the Applications > Internet menu.
Installing JDownloader via the PPA isn't too much different than downloading it from it's website since a script automatically downloads and installs the latest JDownloader version in both cases (not 100% sure about this though), I found this as a great opportunity to remind you of JDownloader, which many consider to be the best download manager.
Saturday, August 14, 2010
How to connect to Streamyx with DLink 2640-T wireless router
I found in my website log, apparently somebody trying to find out how to connect to Streamyx broadband using the latest DLink 2640T. Since I own one, I decided to share my settings to enable you to connect to Streamyx.

Your Dlink wireless router should be able to connect to Streamyx broadband services now.
- First point your favorite browser to http://192.168.1.1/, enter your username and password (default: admin | admin)
- Web configuration user interface will be displayed, click WAN
- Change the VPI value from '8' to '0'
- Enter your Streamyx username and password below
- Finally go to Tools->System. Click "Save and Reboot" there to save your changes.
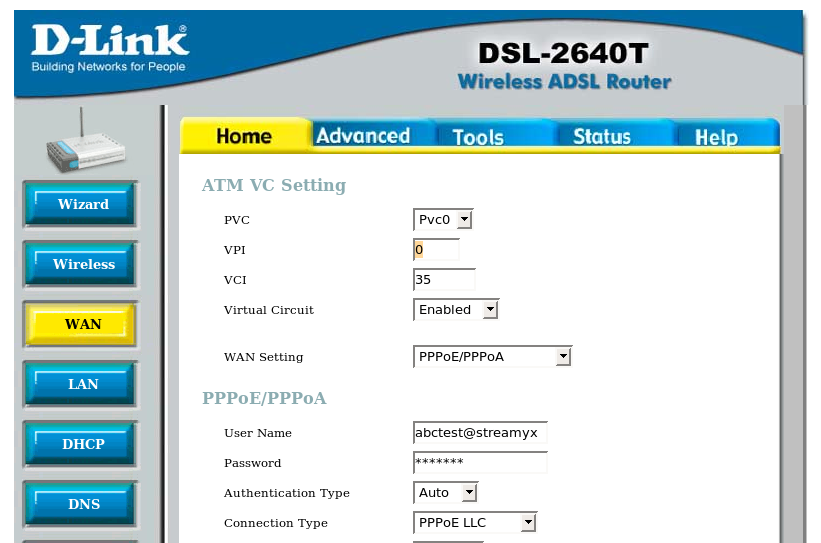
Your Dlink wireless router should be able to connect to Streamyx broadband services now.
Wednesday, July 14, 2010
Set A Static IP Address On Ubuntu 10.04 Lucid Lynx
It is not intuitively obvious how to assign Ubuntu 10.04 Lucid Lynx a a static IP address from the command line. However, much of Linux administration involves the editing of text files, and assigning a static IP address is no different. You’ll need to edit the following file:
/etc/network/interfaces
Initially, the file only contains information about your local loopback address:
auto lo
iface lo inet loopback
To assign a static IP address, you’ll need to make some changes to this file.
Let’s say you want to assign a static IP of 192.168.1.2 to your eth0 network connection (the first Ethernet adapter on your system; if you only have one, it will be eth0), with a subnet mask of 255.255.255.0 and a local gateway of 192.168.1.1. First, make a backup copy of the interfaces file:
sudo vi /etc/network/interfaces
(Obviously you can substitue emacs or your editor of choice.)
Once the file is open, add the following lines:
Once you’ve added these lines, save the interfaces file to disk, and exit your text editor. If you want to add a static DNS server, you’ll need to edit the /etc/resolv.conf file with this command:
sudo vi /etc/resolv.conf
To set a static DNS server with the address of 192.168.1.10, add this line to the file:
You’ll then to need have your system load the new IP configuration. You can do that by rebooting, but if that takes too long, you can use this command to force Ubuntu to re-read the configuration files:
Your system will then have a static IP address.
/etc/network/interfaces
Initially, the file only contains information about your local loopback address:
auto lo
iface lo inet loopback
To assign a static IP address, you’ll need to make some changes to this file.
Let’s say you want to assign a static IP of 192.168.1.2 to your eth0 network connection (the first Ethernet adapter on your system; if you only have one, it will be eth0), with a subnet mask of 255.255.255.0 and a local gateway of 192.168.1.1. First, make a backup copy of the interfaces file:
sudo cp /etc/network/interfaces ~
This will make a backup copy in your home directory in case something goes amiss during the editing process. Next, fire up a text editor:sudo vi /etc/network/interfaces
(Obviously you can substitue emacs or your editor of choice.)
Once the file is open, add the following lines:
iface eth0 inet static
address 192.168.1.2
netmask 255.255.252.0
gateway 192.168.1.1
address 192.168.1.2
netmask 255.255.252.0
gateway 192.168.1.1
Once you’ve added these lines, save the interfaces file to disk, and exit your text editor. If you want to add a static DNS server, you’ll need to edit the /etc/resolv.conf file with this command:
sudo vi /etc/resolv.conf
To set a static DNS server with the address of 192.168.1.10, add this line to the file:
nameserver 192.168.1.10
Save the file, and exit your text editor.You’ll then to need have your system load the new IP configuration. You can do that by rebooting, but if that takes too long, you can use this command to force Ubuntu to re-read the configuration files:
sudo ifup eth0
Your system will then have a static IP address.
Subscribe to:
Posts (Atom)